Todos Auth Example
Introduction
We will continue our Todos Example to have a following features:
- User can register
- User can login and logout
- User's has own todos
We will use JSON Web Tokens to authenticate the user.
Backend
Dependencies
You will need to install a following dependencies to your server side project:
| cd server
npm i jsonwebtoken
npm i mongoose-unique-validator
npm i bcrypt
|
Environment variables and server secrets
You will need to generate a server side secret string to use JWT. Basicly you can use any string, but you can use Node to generate this string to you. Creating a random string for the server secret can be done in the Node.js REPL with the crypto module.
Launch a Node without any JavaScript file:
| Welcome to Node.js v18.12.1.
Type ".help" for more information.
> require('crypto').randomBytes(64).toString('hex')
'fad0968850a2fa26a0adbb13f6ebcc67eb7140faaf6b801eeae2044bf2dec2689cff275cd1e7fae4b296396f23269363527d06650eb1bbfcb4c2f9d1075bf358'
>
|
Add generated secret string and .env file (and other needed variables):
| PORT=3000
MONGODB_URI='YOUR_MONGODB_CONNECTION_STRING_HERE'
ACCESS_TOKEN_SECRET='fad0968850a2fa26a0adbb13f6ebcc67eb7140faaf6b801eeae2044bf2dec2689cff275cd1e7fae4b296396f23269363527d06650eb1bbfcb4c2f9d1075bf358'
|
Modify existing Todo model
Modify your Todo model to save todos to JWTTodos collection in MongoDB. This is only made to separate this exercises collections to different than a previous example todos.
| models/Todo.js |
|---|
1
2
3
4
5
6
7
8
9
10
11
12
13
14 | const mongoose = require('mongoose');
const todoSchema = new mongoose.Schema({
text: {
type: String,
minlength: 5,
required: true
},
date: Date
});
const Todo = mongoose.model('Todo', todoSchema, 'JWTTodos');
module.exports = Todo;
|
Modify todos routes
Create a new controllers folder and a new todos.js file into that folder. Move all todos route codes from index.js into it. You need to modify endpoints to use todosRouter variable and correct path (/api/todos path will be used now in index.js).
| contollers/todos.js |
|---|
1
2
3
4
5
6
7
8
9
10
11
12
13
14
15
16
17
18
19
20
21
22
23
24
25
26
27
28
29
30
31
32
33
34
35
36
37 | const todosRouter = require('express').Router();
const Todo = require('../models/todo');
todosRouter.post('/', async (req, res) => {
try {
const todo = await Todo.create(req.body);
res.status(201).json({ success: true, data: todo });
} catch (error) {
console.log(error);
res.status(400).json({ success: false, msg: 'Error with creating a todo!' });
}
});
todosRouter.get('/', async (req, res) => {
try {
const todos = await Todo.find({});
res.status(200).json({ success:true, data:todos });
} catch (error) {
res.status(500).json({ success:false, msg: error });
}
});
todosRouter.get('/:id', async (req, res) => {
const { id } = req.params;
const todo = await Todo.findById(id);
if (todo) res.status(200).json({ success:true, data:todo });
else res.status(500).json({ success:false, error:"Todo not found!" });
});
todosRouter.delete('/:id', async (req, res) => {
const { id } = req.params;
const todo = await Todo.findByIdAndDelete(id);
if (todo) res.status(200).json({ success:true, data:todo });
else res.status(500).json({ success:false, error:"Todo not found!" });
})
module.exports = todosRouter;
|
Use todos router in your index.js.
| index.js |
|---|
| // use todos route
const todosRouter = require('./controllers/todos');
app.use('/api/todos', todosRouter);
|
Note
Now our main app is clean and different routes can be separated to different files inside a controllers folder. Read more about here Routing.
User model
Create a new User.js model to your models folder. User Model is used to store username, todos and passwordHash to MongoDB. We will use Mongoose Unique Validator to validate unique username. User will have passwordHash, which will be created with bcrypt.
When User is asked as a JSON, transform is used to remove passwordHash from the returning JSON data / document. SO, password hash string is not visible at any UI or can't be get by the caller client.
| models/User.js |
|---|
1
2
3
4
5
6
7
8
9
10
11
12
13
14
15
16
17
18
19
20
21
22
23
24 | const mongoose = require('mongoose');
const uniqueValidator = require('mongoose-unique-validator');
const Schema = mongoose.Schema;
const UserSchema = new Schema({
username: {
type: String,
required: true,
unique: true,
},
todos: [ { type: mongoose.Schema.Types.ObjectId, ref: 'Todo' } ],
passwordHash: String
});
UserSchema.set('toJSON', {
transform: (document, returnedObject) => {
delete returnedObject.passwordHash
}
});
UserSchema.plugin(uniqueValidator);
const UserModel = mongoose.model('User', UserSchema, 'JWTUsers');
module.exports = UserModel;
|
You will use User model later in users controller.
Register/Add a new user
Add a new users.js controller file to controllers folder. Create a new endpoint for POST method, which will be used to add a new user to MongoDB. Use bcrypt to hash user password and create a new user. Save user to MongoDB. A saved user information is sent to the client or possible error message (like ValidationError error if username isn't unique).
| controllers/users.js |
|---|
 1
 2
 3
 4
 5
 6
 7
 8
 9
10
11
12
13
14
15
16
17
18
19
20
21
22
23
24 | const bcrypt = require('bcrypt');
const usersRouter = require('express').Router();
const User = require('../models/user');
usersRouter.post('/', async (req, res, next) => {
const { username, password } = req.body;
const saltRounds = 10;
const passwordHash = await bcrypt.hash(password, saltRounds);
const user = new User({
username: username,
passwordHash: passwordHash
});
try {
const savedUser = await user.save()
res.json(savedUser);
} catch(error) {
res.status(400).json({ error: error.message });
}
})
module.exports = usersRouter;
|
Use users router in your index.js.
| index.js |
|---|
| // use users route
const usersRouter = require('./controllers/users');
app.use('/api/users', usersRouter);
|
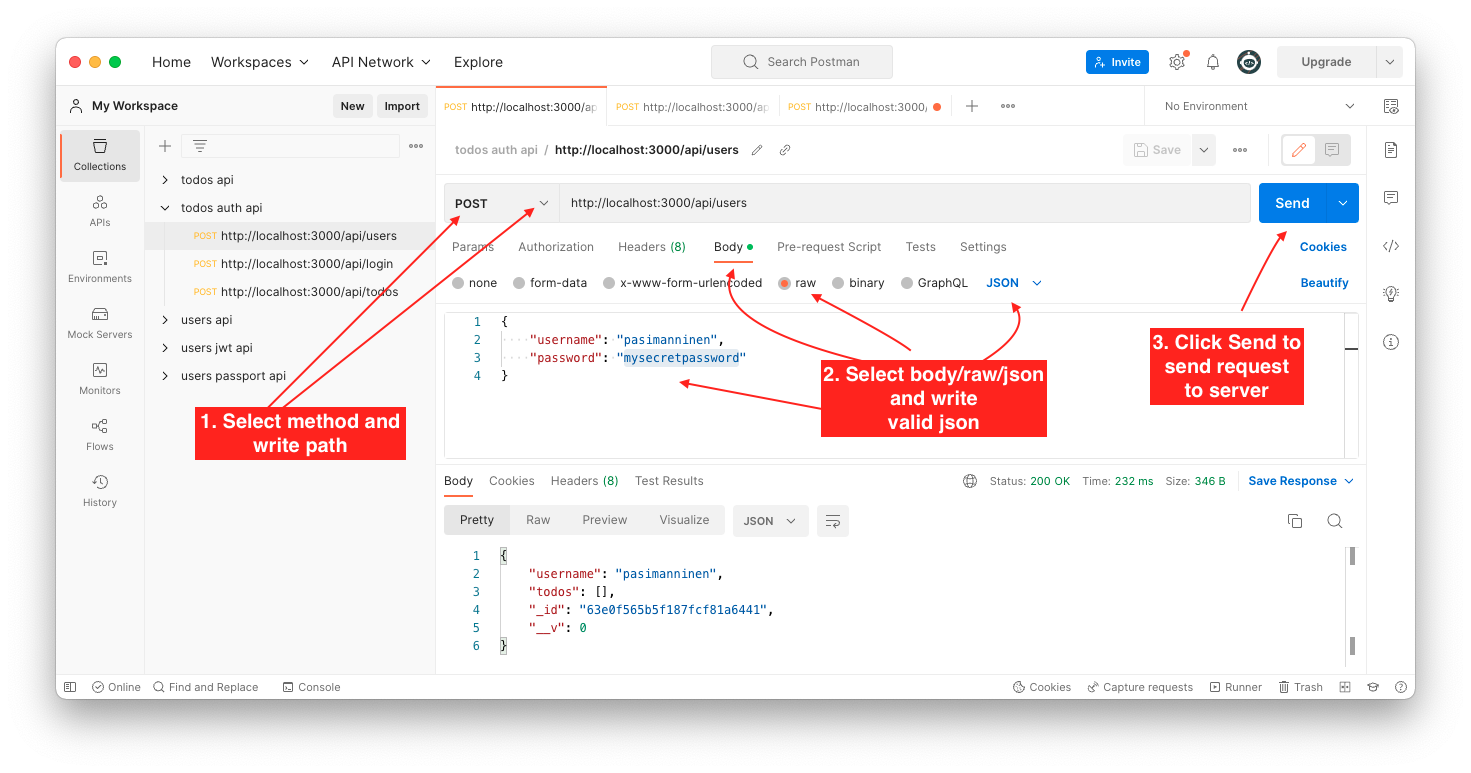
Use Postman to register a new user. Note that returned user JSON doesn't have passwordHash field in JSON. Click image to see it bigger!
Look your MongoDB and find your stored user. Note that password is hashed.

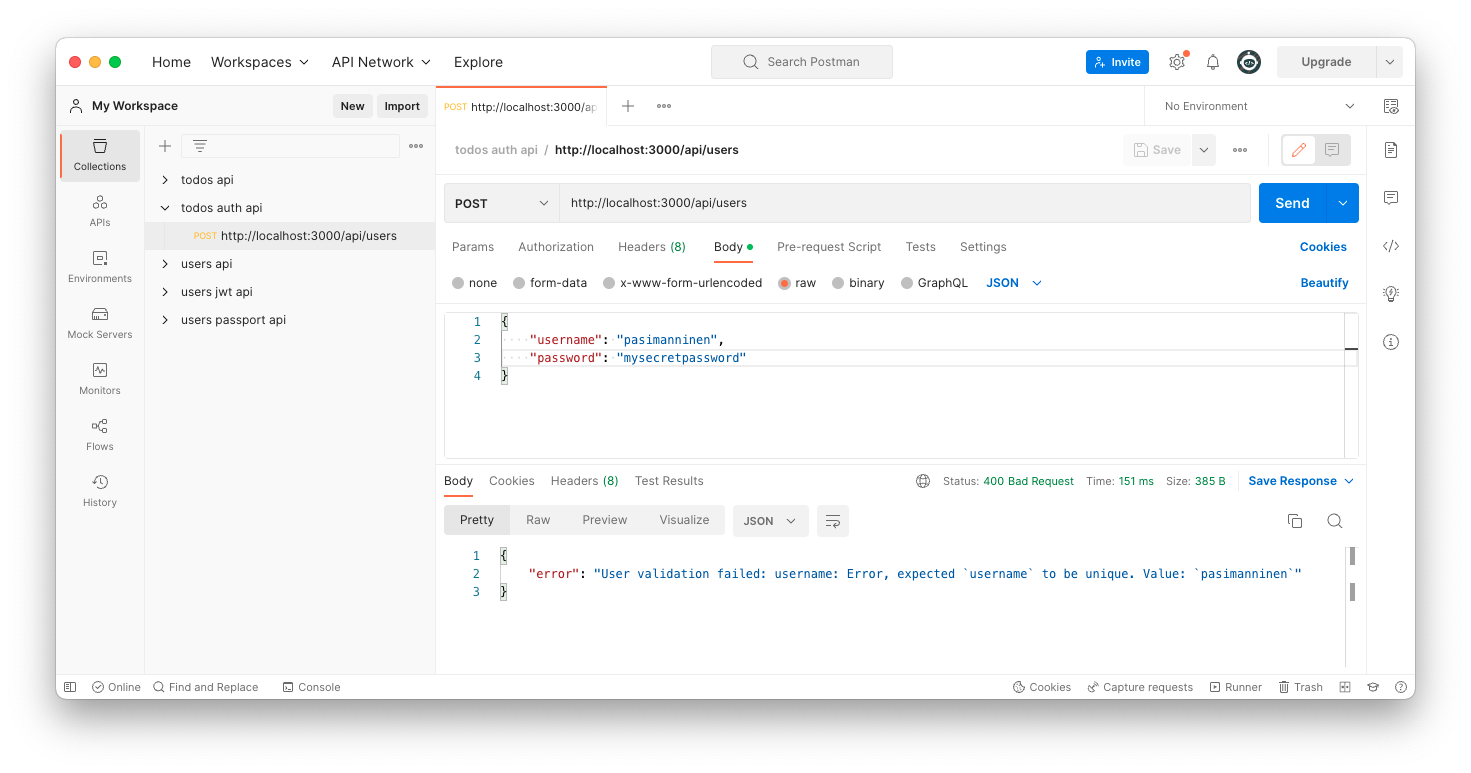
Try to add another user with a same username and check how mongoose-unique-validator will detect attempt to create a new user with same username.
Create a Login route and get JWT token
Create a new login route controller controllers/login.js to your application. First user will be found from the MongoDB with findOne function and then password correction will be checked with bcrypt.compare function. Unauthorized statuscode 400 will be returned if users's password is not correct one. A new JWT token will be created, if username and password are correct with jwt.sign() function. Token, username and id will be send back to the client.
| controllers/login.js |
|---|
1
2
3
4
5
6
7
8
9
10
11
12
13
14
15
16
17
18
19
20
21
22
23
24
25
26
27
28 | const jwt = require('jsonwebtoken');
const bcrypt = require('bcrypt');
const loginRouter = require('express').Router();
const User = require('../models/user');
loginRouter.post('/', async (req, res) => {
const { username, password } = req.body;
const user = await User.findOne({ username: username });
if (user) {
const validPassword = await bcrypt.compare(password, user.passwordHash);
if (validPassword) {
const payload = {
"username": user.username,
"id": user._id
}
const token = jwt.sign(payload, process.env.ACCESS_TOKEN_SECRET);
// login ok -> send token to the client
res.status(200).send({ token, username: user.username, id: user._id});
} else {
res.status(400).json({ error: "Username or password is invalid!" });
}
} else {
res.status(401).json({ error: "User does not exist!" });
}
});
module.exports = loginRouter;
|
Use login router in your index.js.
| index.js |
|---|
| const loginRouter = require('./controllers/login');
app.use('/api/login', loginRouter);
|
Use Postman to send login request to server side. JWT token will be send to the client. Client should store this client somehow and it need to be used with other request to server side. Click image to see it bigger!
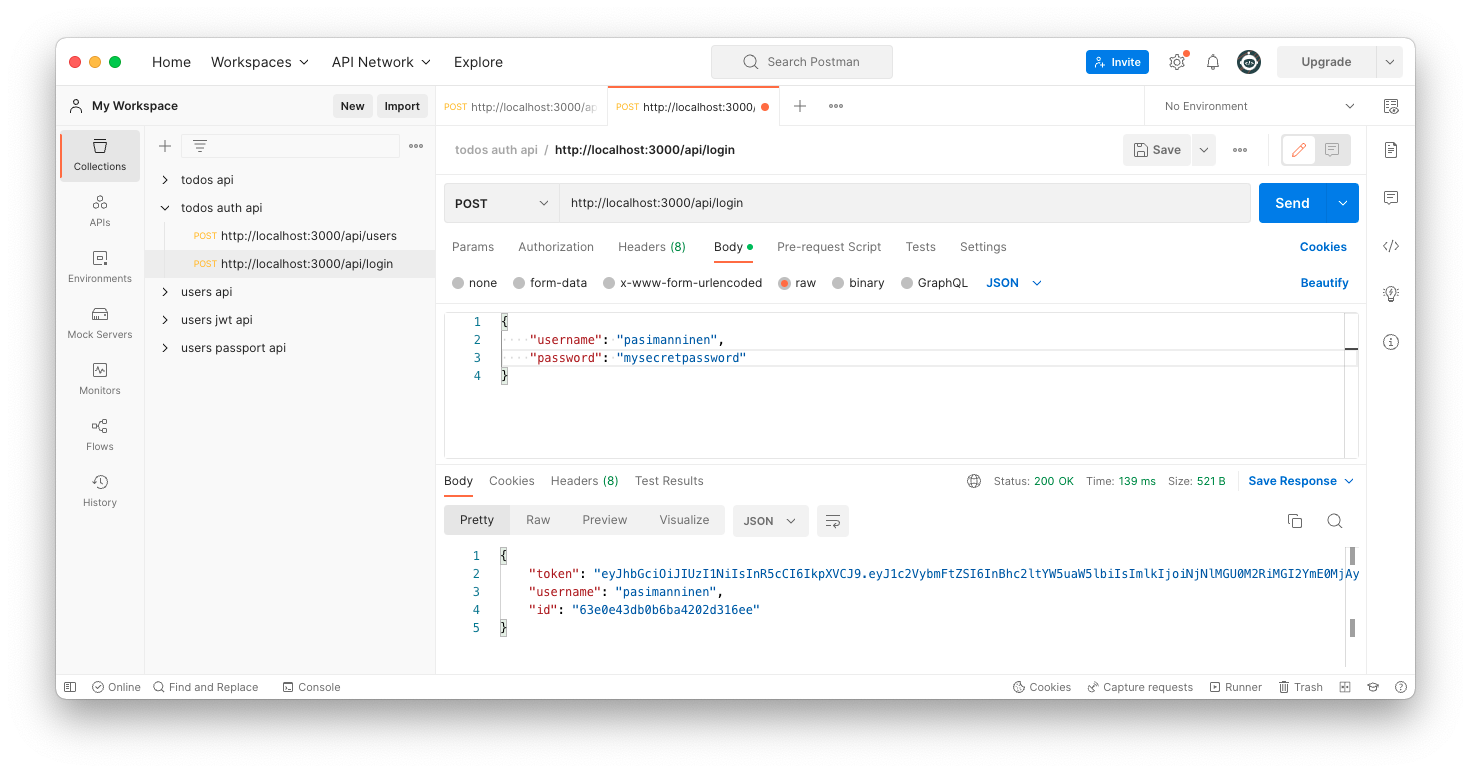
You should see a token in a Postman (of course it will be different one).
| {
"token": "eyJhbGciOiJIUzI1NiIsInR5cCI6IkpXVCJ9.eyJ1c2VybmFtZSI6InBhc2ltYW5uaW5lbiIsImlkIjoiNjNlMGU0M2RiMGI2YmE0MjAyZDMxNmVlIiwiaWF0IjoxNjc1Njg0MTgxfQ.-gqQhaL-F6_HmIsTAB0YQPSBn206WaOu3PnaHlRV4Go",
"username": "pasimanninen",
"id": "63e0e43db0b6ba4202d316ee"
}
|
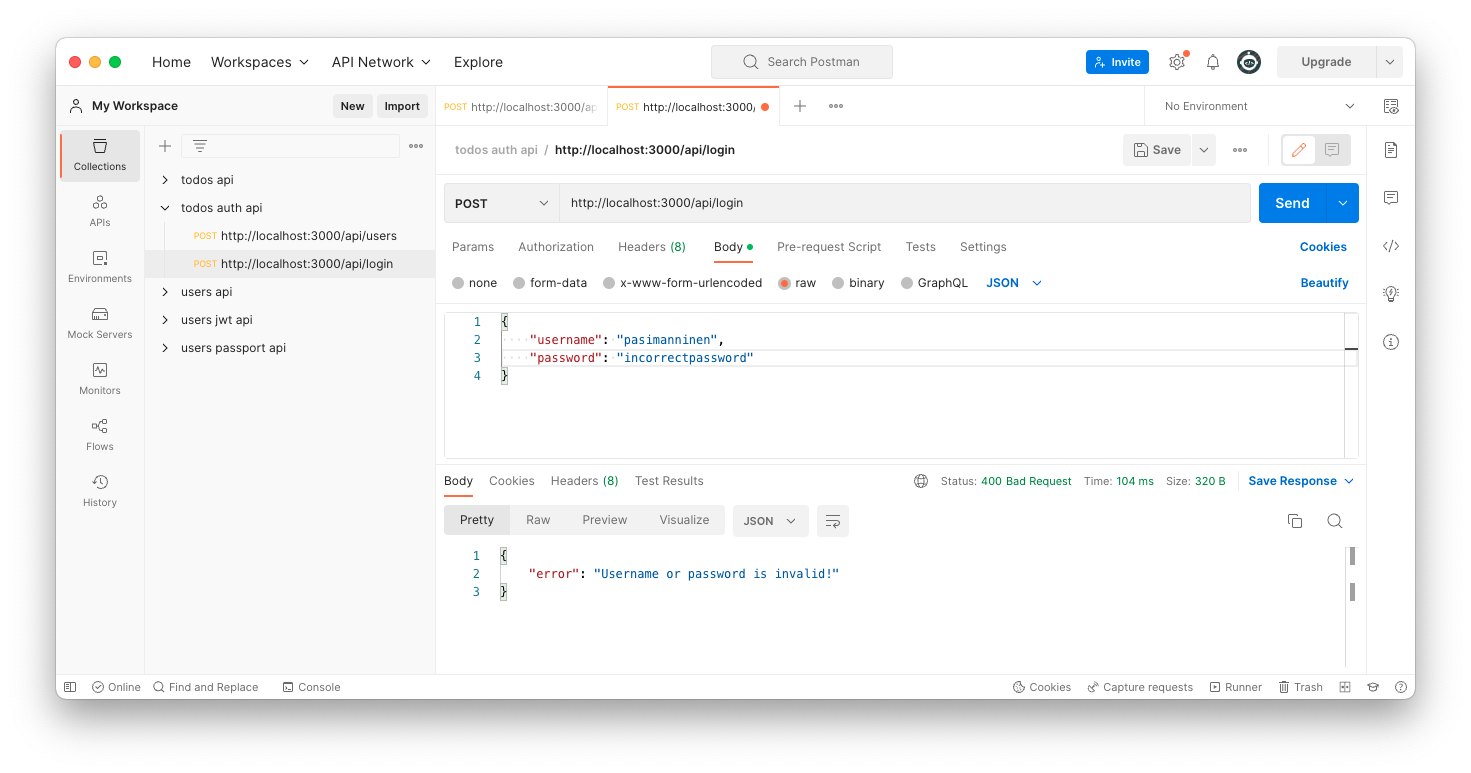
Remember try incorrect username or password to see response from the server side.
Authorization middleware
We will need authorization in many endpoints. So, it would be a good idea to do authorization in middleware and use it before every route that needs a authorization. JWT Token will be get with Bearer authentication type. Token will be validated with jwt.verify() function.
Create a new middlewares folder and auth.js inside it.
| middlewares/auth.js |
|---|
1
2
3
4
5
6
7
8
9
10
11
12
13
14
15
16
17
18
19
20
21
22
23
24 | const jwt = require('jsonwebtoken');
const auth = async (req,res,next) => {
// get authorization token
const authorization = req.headers.authorization;
if (!authorization || !authorization.startsWith('Bearer')) {
res.status(401).json({ error: 'User token missing or invalid!' });
} else {
// get token
const token = authorization.split(' ')[1];
try {
// verity token
const decoded = jwt.verify(token,process.env.ACCESS_TOKEN_SECRET);
// add clients data to request, se it can be found from called endpoint
req.decoded = decoded;
// go to next middleware
next();
} catch (error) {
res.status(401).json({ error: 'JWT token is unauthorized!' })
}
}
}
module.exports = auth;
|
Add a new todo
Modify your server application to use above auth middleware, when a todos routes will be called. If authorization is successfully detected in auth middleware, the next() function will send request next to todosRouter.
| index.js |
|---|
| // // use auth middleware
const auth = require('./middlewares/auth');
app.use('/api/todos', auth, todosRouter);
|
Modify your todos.js controller to create a new todo and add it to current user.
| controllers/todos.js |
|---|
1
2
3
4
5
6
7
8
9
10
11
12
13
14
15
16
17
18
19
20
21
22 | const mongoose = require('mongoose');
const todosRouter = require('express').Router();
const Todo = require('../models/todo');
const User = require('../models/user');
todosRouter.post('/', async (req, res) => {
try {
// create a todo
const todo = await Todo.create(req.body);
// find user, add a new todo, req.decoded is object from auth middleware
const user_id = mongoose.Types.ObjectId(req.decoded.id);
await User.findByIdAndUpdate(
user_id,
{ $push: { todos: todo._id } },
{ new: true }
);
res.status(201).json({ success: true, data: todo });
} catch (error) {
console.log(error);
res.status(400).json({ success: false, msg: 'Error with creating a todo!' });
}
});
|
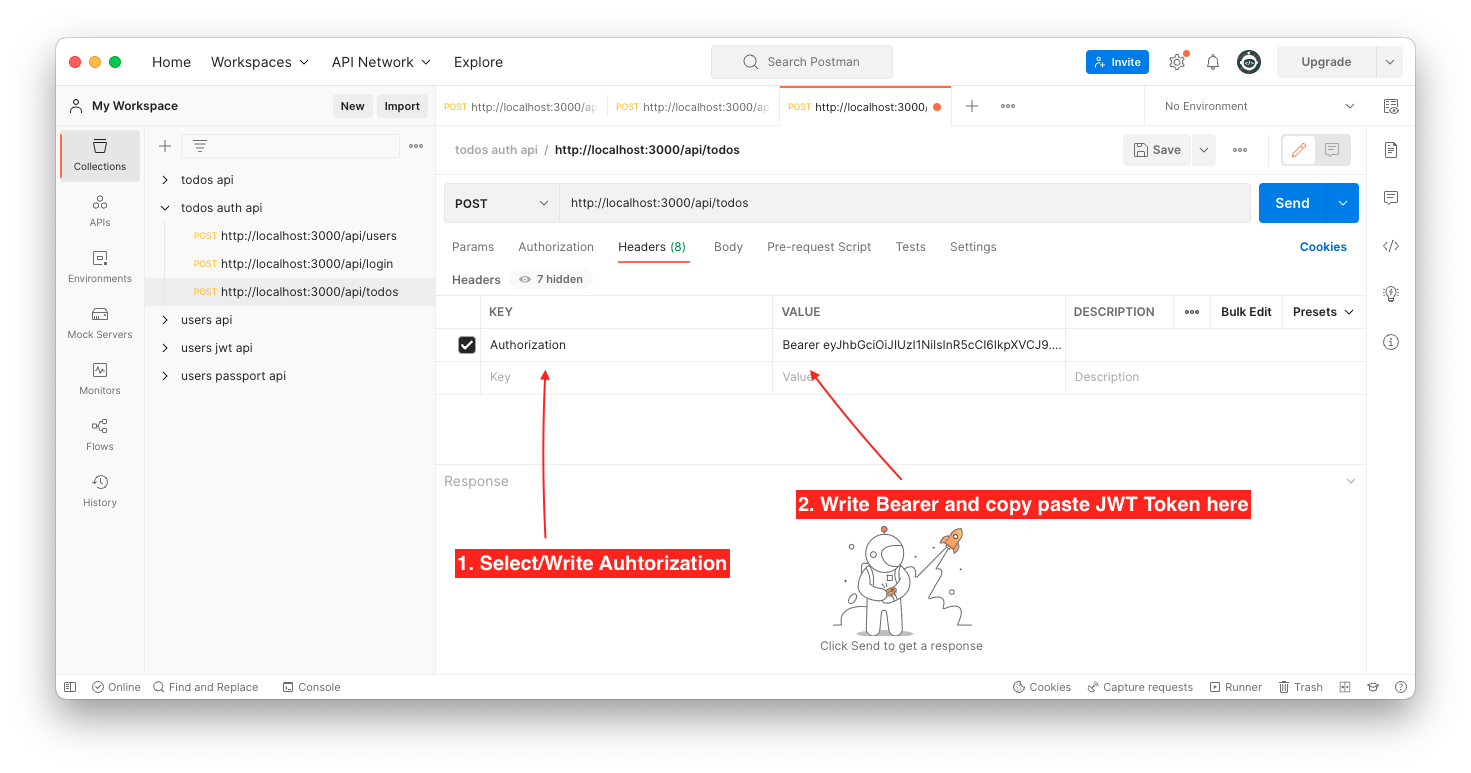
Use Postman to send a new request to server side. First specify to use Authorization header with Bearer and your valid JWT Token (copy paste it from Postman login route).
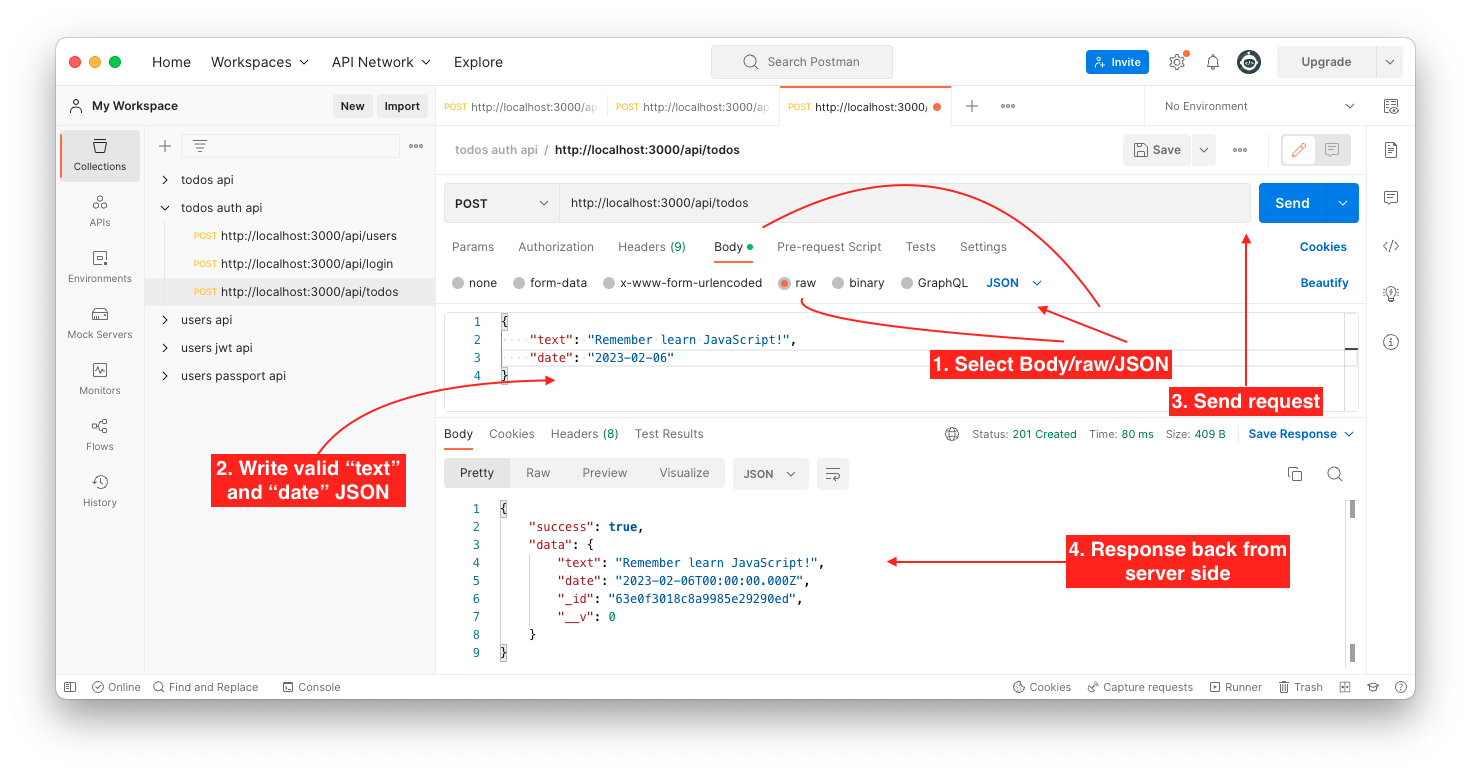
And then add a new todo text and send the request to server side.
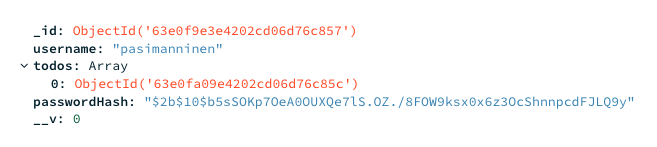
Look new a new todo from MongoDB.

And it's id will be linked to users todos.
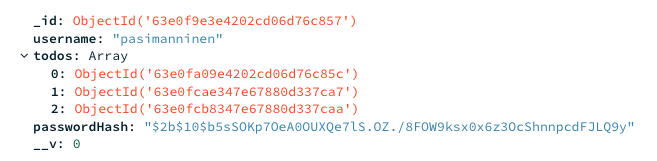
Add a few more todos!
Note
Remember try to call your add a todo endpoint also without JWT token. SO, data should not be added without correct JWT token.
Get todos
Modify your todos.js controller to get user's todos. Use populate() function to get all users todos. Remember use correct value in Authorization.
| controllers/todos.js |
|---|
| todosRouter.get('/', async (req, res) => {
try {
const user_id = mongoose.Types.ObjectId(req.decoded.id);
const user = await User.findById(user_id).populate('todos');
res.status(200).json({ success:true, data:user.todos });
} catch (error) {
res.status(500).json({ success:false, msg: error });
}
});
|
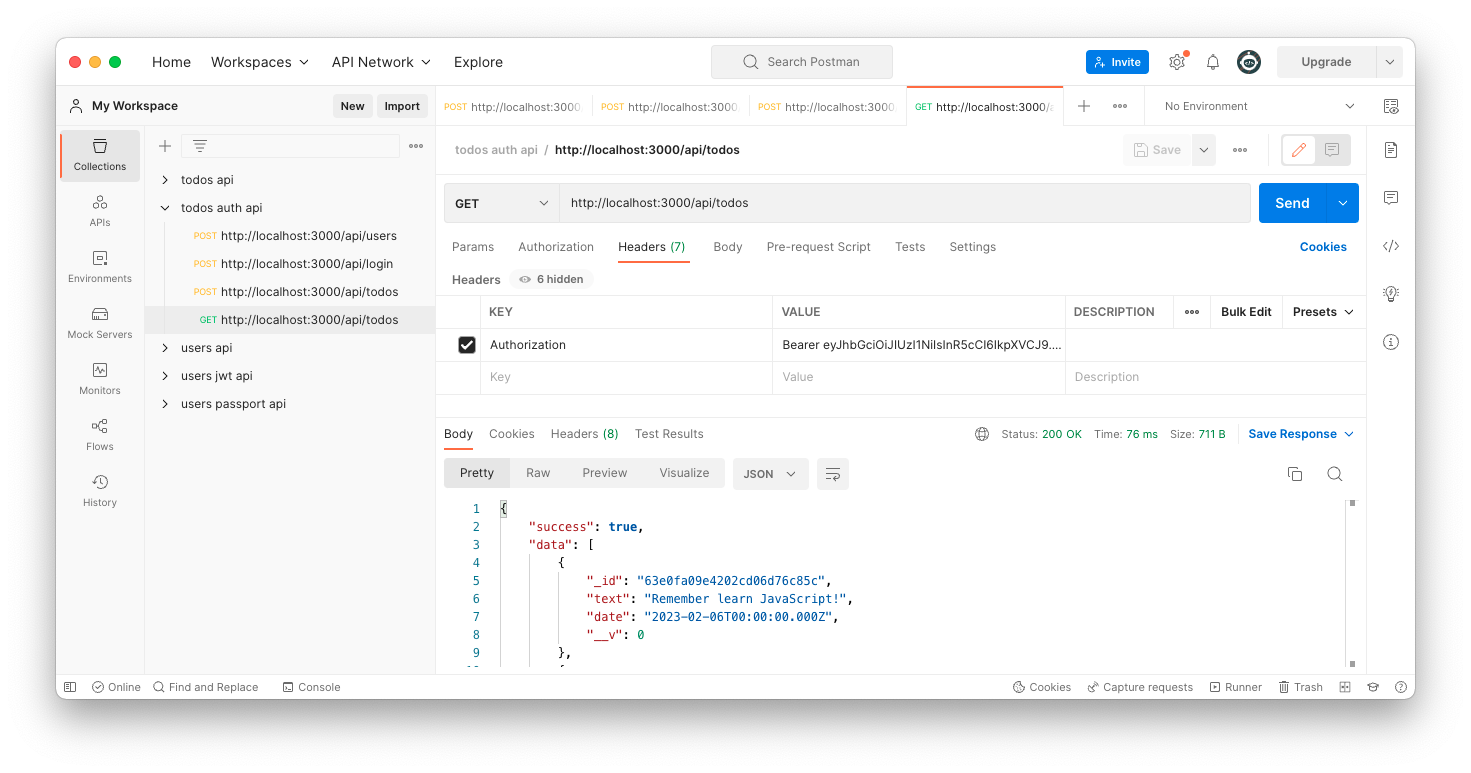
Use Postman to send a new request to server side.
Get/Delete one todo
We will now only modify delete route. First todo will be removed from todos collection and then a todo will be removed from users todos array.
| controllers/todos.js |
|---|
1
2
3
4
5
6
7
8
9
10
11
12
13
14
15
16
17
18
19
20 | todosRouter.delete('/:id', async (req, res) => {
try {
const { id } = req.params;
// remove todo from todos collection
const todo = await Todo.findByIdAndDelete(id);
// remove todo from users todos array
const user_id = mongoose.Types.ObjectId(req.decoded.id);
// remove todo from users todos
await User.findByIdAndUpdate(
user_id,
{ $pull: { todos: todo._id } },
{ new: true }
);
if (todo) res.status(200).json({ success:true, data:todo });
else res.status(500).json({ success:false, error: "Todo not found!" });
} catch (error) {
console.log(error);
res.status(400).json({ success: false, msg: 'Error with removing a todo!' });
}
})
|
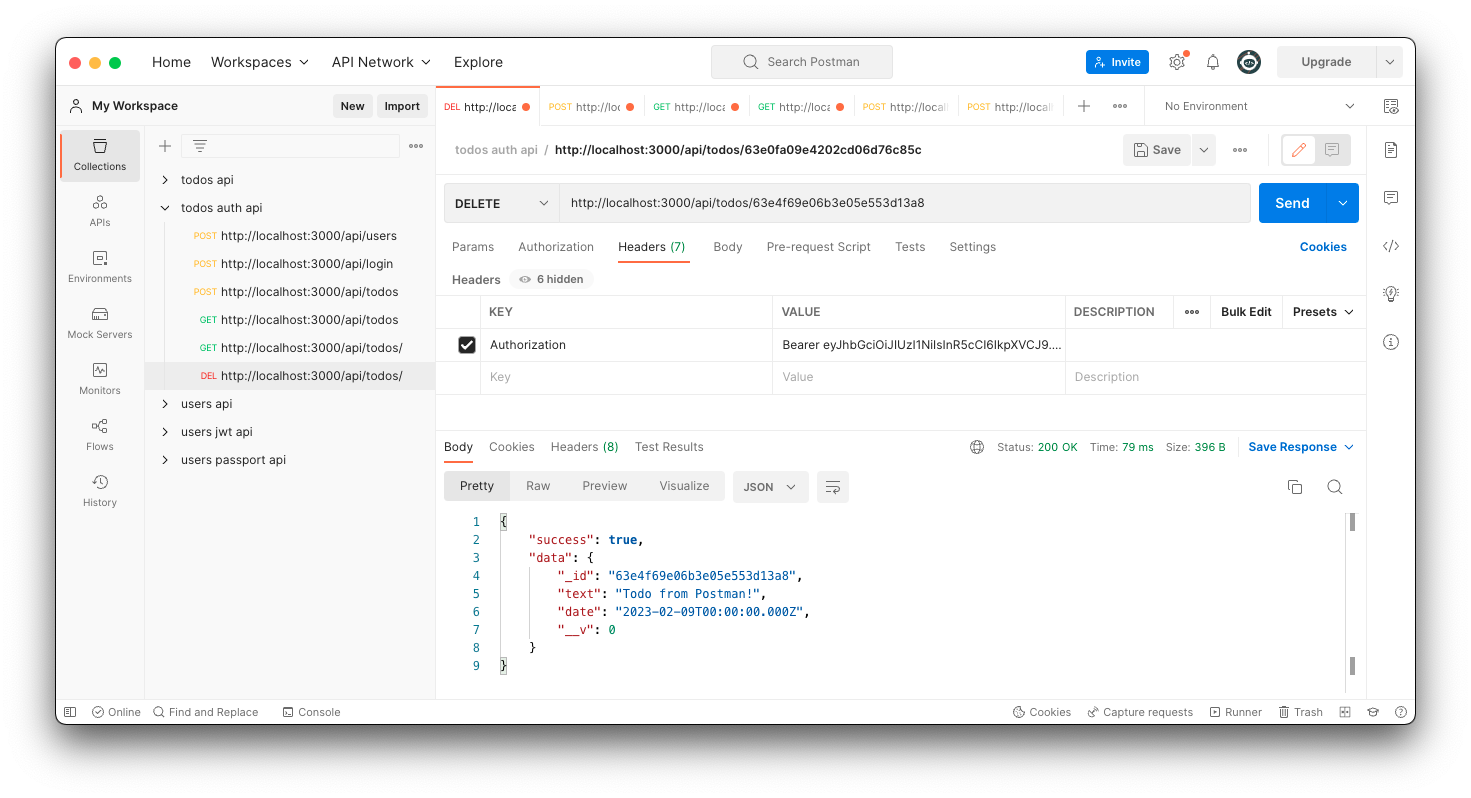
Use Postman to send a new request to server side.
Frontend
We will need to modify our frontend application to show a following "pages": registration, login and todos (which we now only have). We will use React Router to switch between these pages.
Go to your client folder and install React Router.
| npm install react-router-dom
|
UI - Banner component
Create a new components folder inside your src folder. Create a new banner.js file inside your components folder. This file will hold our Banner component and it will be used inside our pages.

| src/components/banner.js |
|---|
| // Banner component
function Banner() {
return (
<h1>Todo Example with React</h1>
)
}
export default Banner;
|
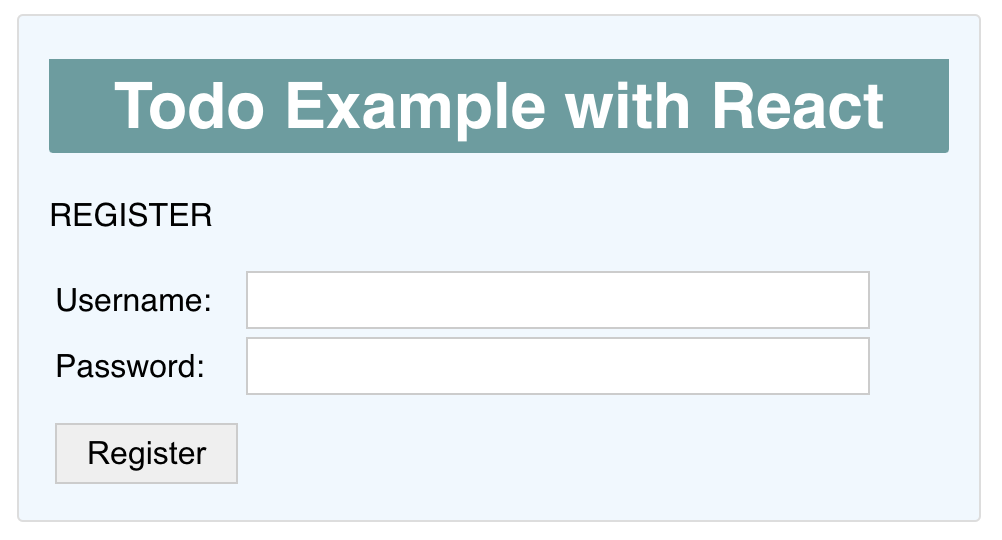
UI - Register Page
Create a new routes folder inside your src folder. Create a new register.js file inside it.
| src/routes/register.js |
|---|
1
2
3
4
5
6
7
8
9
10
11
12
13
14
15
16
17
18
19
20
21
22
23
24
25
26
27
28
29
30
31
32
33 | import React, { useState } from 'react';
import Banner from '../components/banner';
function Register() {
const [infotext, setInfotext] = useState('');
return (
<div>
<Banner/>
<p>REGISTER</p>
<form>
<table>
<tbody>
<tr>
<td>Username:</td>
<td><input type='text' placeholder="" name="username" autoComplete="username"/></td>
</tr>
<tr>
<td>Password:</td>
<td><input type='password' placeholder="" name="password" autoComplete="off" /></td>
</tr>
<tr>
<td><input type='button' value='Register' /></td>
<td><span className="Infotext">{infotext}</span></td>
</tr>
</tbody>
</table>
</form>
</div>
)
}
export default Register;
|
UI - Login Page
Create a new login.js file inside your routes folder.
| src/routes/login.js |
|---|
1
2
3
4
5
6
7
8
9
10
11
12
13
14
15
16
17
18
19
20
21
22
23
24
25
26
27
28
29
30
31
32
33
34
35
36 | import React, { useState } from 'react';
import Banner from '../components/banner';
function Login() {
const [infotext, setInfotext] = useState('');
return (
<div>
<Banner/>
<p>LOGIN</p>
<form>
<table>
<tbody>
<tr>
<td>Username:</td>
<td><input type='text' placeholder="" name="username" autoComplete="username"/></td>
</tr>
<tr>
<td>Password:</td>
<td><input type='password' placeholder="" name="password" autoComplete="off" /></td>
</tr>
<tr>
<td><input type='button' value='Login' /></td>
<td><span className="Infotext">{infotext}</span></td>
</tr>
</tbody>
</table>
</form>
<p>
Need an account? <span className="Register">REGISTER</span>
</p>
</div>
)
}
export default Login;
|
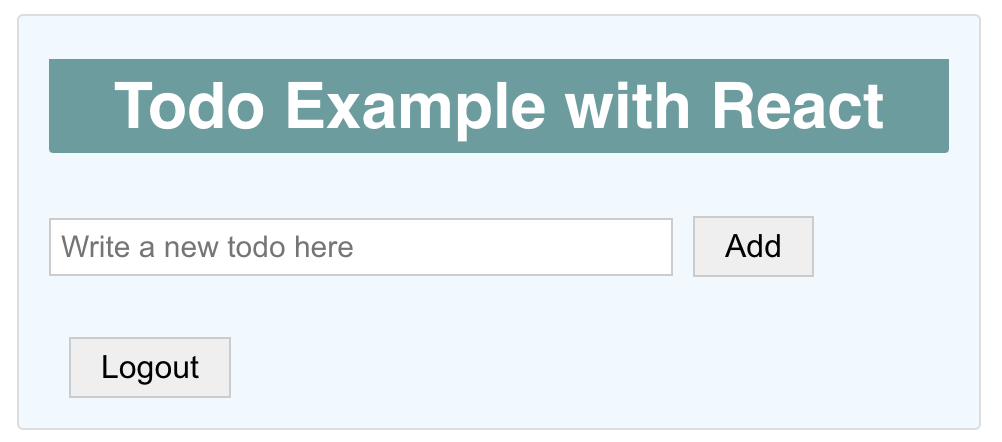
UI - Home Page
Create a new home.js file inside your routes folder. Copy all your App.js content to home.js and make a few modifications.
- use styles from correct folder
- remove used Banner function and import it from components
- add a Logout button
- change
App function name to Home
- export
Home function/component by default
| src/routes/home.js |
|---|
 1
 2
 3
 4
 5
 6
 7
 8
 9
10
11
12
13
14
15
16
17
18
19
20
21
22
23
24
25
26
27
28
29
30
31
32
33
34
35
36
37
38
39
40
41
42
43
44
45
46
47
48
49
50
51
52
53
54
55
56
57
58
59
60
61
62
63
64
65
66
67
68
69
70
71
72
73
74
75
76
77
78
79
80
81
82
83
84
85
86 | import React, { useEffect, useState } from 'react';
import axios from 'axios';
import moment from 'moment';
import '../App.css';
import Banner from '../components/banner';
// ToDoFormAndList component
function ToDoFormAndList() {
// new todo text in input field
const [newTodoText, setNewTodoText] = useState("");
// all todos in array
const [todos, setTodos] = useState([]);
// load todos from backend
async function fetchData() {
try {
let response = await axios.get('http://localhost:3000/api/todos');
//console.log(response.data);
setTodos(response.data.data);
} catch (error) {
console.log(error);
}
}
// start loading datas from backend
useEffect(() => {
fetchData();
}, []) // load once, use => []
// add a new item
const addTodo = async () => {
//console.log(`Add a new todo ${newTodoText}`);
const data = {
'text': newTodoText,
'date': moment().format() // "2023-01-24T12:07:58+02:00"
}
const response = await axios.post('http://localhost:3000/api/todos', data);
//console.log(response.data);
setTodos([...todos, response.data.data])
setNewTodoText('');
}
// remove todo
const removeTodo = async (id) => {
//console.log(id)
const response = await axios.delete(`http://localhost:3000/api/todos/${id}`);
// filter/remove todo item from todos state array
let newTodos = todos.filter(todo => todo._id !== id)
setTodos(newTodos)
}
// create li-elements from todos data
const todoItems = todos.map((todo,index) =>
<li key={index}>
{ todo.text} : { moment(todo.date).format('DD.MM.YYYY')} <span onClick={() => removeTodo(todo._id)}> x </span>
</li>
);
return (
<div>
<form>
<input type='text'
value={newTodoText}
onChange={event => setNewTodoText(event.target.value)}
placeholder="Write a new todo here" />
<input type='button' value='Add' onClick={addTodo}/>
</form>
<ul>
{ todoItems }
</ul>
<input type='button' value='Logout'/>
</div>
)
}
// Home component
function Home() {
return (
<div>
<Banner/>
<ToDoFormAndList/>
</div>
);
}
export default Home;
|
React Router
Modify your index.js to use React Router.
| index.js |
|---|
1
2
3
4
5
6
7
8
9
10
11
12
13
14
15
16
17 | import React from 'react';
import ReactDOM from 'react-dom/client';
import './index.css';
import App from './App';
import reportWebVitals from './reportWebVitals';
import { BrowserRouter } from "react-router-dom";
const root = ReactDOM.createRoot(document.getElementById('root'));
root.render(
<React.StrictMode>
<BrowserRouter>
<App />
</BrowserRouter>
</React.StrictMode>
);
reportWebVitals();
|
Modify your App.js to use different pages with React Router. Login page will be shown by default.
| App.js |
|---|
1
2
3
4
5
6
7
8
9
10
11
12
13
14
15
16
17 | import { Routes, Route, Navigate } from "react-router-dom";
import Login from './routes/login';
import Register from './routes/register';
import Home from './routes/home';
function App() {
return (
<Routes>
<Route path="/" element={<Navigate to='/login'/>} />
<Route path="/login" element={<Login />} />
<Route path="/register" element={<Register />} />
<Route path="/home" element={<Home />} />
</Routes>
);
}
export default App;
|
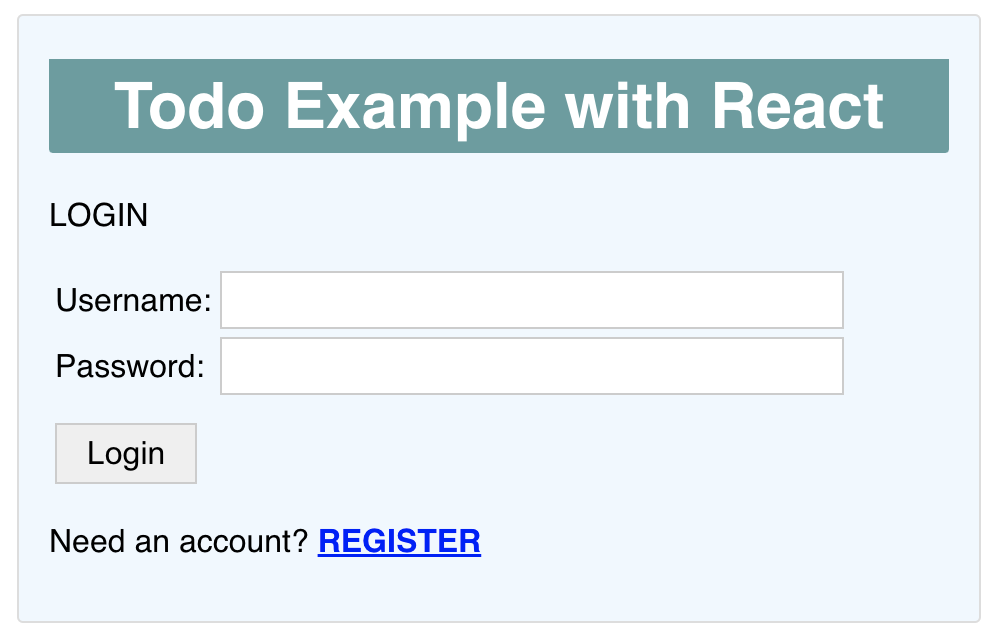
Save all files and you should see now a login page in your web browser.
Note
You can decide which page will be shown as default. Now a login page is a default, but user need to register first (one time).
Login page to Register page
Modify your Login page code to handle to move Register page. Add an onClick event handling to your span element and use useNavigate from react-router-dom to navigate /register route.
| src/routes/login.js |
|---|
 1
 2
 3
 4
 5
 6
 7
 8
 9
10
11
12
13
14
15
16
17
18
19
20
21
22
23
24
25
26
27
28
29 | import React, { useState } from 'react';
import Banner from '../components/banner';
import { useNavigate } from "react-router-dom";
function Login() {
const [infotext, setInfotext] = useState('');
const navigate = useNavigate();
const Register = () => {
navigate('/register');
}
return (
<div>
<Banner/>
<p>LOGIN</p>
<form>
<table>
//...
</table>
</form>
<p>
Need an account? <span className="Register" onClick={() => Register()}>REGISTER</span>
</p>
</div>
)
}
export default Login;
|
Now your application should display a Register page when a span element is clicked.
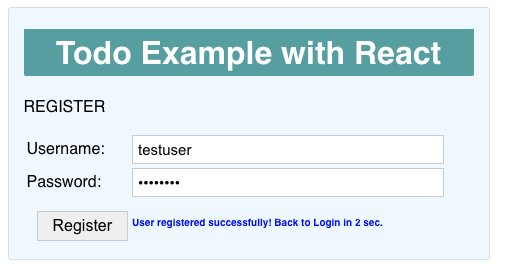
Register
Modify your register page to handle a user registration.
You will use:
react-router-dom and navigate back to Login page if registration is made successfullyaxios to send POST request to server side- React hooks to store
username and password state
- call own made
register function from button component
- successfull message will be shown 2 sec and then move back to login
- otherwise error message will be shown
| src/routes/register.js |
|---|
 1
 2
 3
 4
 5
 6
 7
 8
 9
10
11
12
13
14
15
16
17
18
19
20
21
22
23
24
25
26
27
28
29
30
31
32
33
34
35
36
37
38
39
40
41
42
43
44
45
46
47
48
49
50
51
52
53
54
55
56
57
58
59
60
61
62
63
64
65
66
67 | import React, { useState } from 'react';
import Banner from '../components/banner'
import { useNavigate } from "react-router-dom";
import axios from 'axios';
function Register() {
const [infotext, setInfotext] = useState('');
const [username, setUsername] = useState('');
const [password, setPassword] = useState('');
const navigate = useNavigate();
// register
const register = async () => {
const data = {
'username': username,
'password': password
}
try {
const response = await axios.post('http://localhost:3000/api/users', data);
// console.log(response.data);
setInfotext('User registered successfully! Back to Login in 2 sec.');
setTimeout(navigate('/login'), 2000);
} catch (error) {
// console.log(error.response);
setInfotext(error.response.data.error);
}
}
return (
<div>
<Banner/>
<p>REGISTER</p>
<form>
<table>
<tbody>
<tr>
<td>Username:</td>
<td>
<input type='text'
placeholder="username"
name="username"
autoComplete="username"
onChange={event => setUsername(event.target.value)} />
</td>
</tr>
<tr>
<td>Password:</td>
<td>
<input type='password'
placeholder="password"
name="password"
autoComplete="off"
onChange={event => setPassword(event.target.value)} />
</td>
</tr>
<tr>
<td><input type='button' value='Register' onClick={() => register()} /></td>
<td><span className="Infotext">{infotext}</span></td>
</tr>
</tbody>
</table>
</form>
</div>
)
}
export default Register;
|
Try to register one user with username and password. App should move to back to Login page after registration is made successfully. Remember check your MongoDB!
Try to register another user with a same username and see the response in inspector.
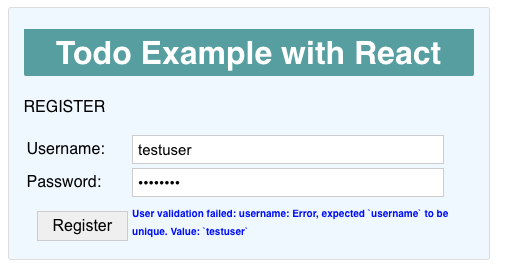
Tip
This is just a demo, you should visualise these nicer and better!
Login
Modify your Login page code to handle login.
You will use:
axios to send POST request to server side- React hooks to store
username and password state
- call own made
login function from button component
- successfull message will be shown 2 sec and then move to home page
- otherwise error message will be shown
| src/routes/login.js |
|---|
1
2
3
4
5
6
7
8
9
10
11
12
13
14
15
16
17
18
19
20
21
22
23
24
25
26
27
28
29
30
31
32
33
34
35
36
37
38
39
40
41
42
43
44
45
46
47
48
49
50
51
52
53
54
55
56
57
58
59
60
61
62
63
64
65
66
67
68
69 | import React, { useState } from 'react';
import Banner from '../components/banner';
import { useNavigate } from "react-router-dom";
import axios from 'axios';
function Login() {
const [infotext, setInfotext] = useState('');
const [username, setUsername] = useState('');
const [password, setPassword] = useState('');
const navigate = useNavigate();
const register = () => {
navigate('/register');
}
const login = async () => {
const data = {
'username': username,
'password': password
}
try {
const response = await axios.post('http://localhost:3000/api/login', data);
console.log(response.data);
setInfotext('User login successfully! Home in 2 sec.');
setTimeout(navigate('/home'), 2000);
} catch (error) {
//console.log(error.response);
setInfotext(error.response.data.error);
}
}
return (
<div>
<Banner/>
<p>LOGIN</p>
<form>
<table>
<tbody>
<tr>
<td>Username:</td>
<td><input type='text'
placeholder="username"
name="username"
autoComplete="username"
onChange={event => setUsername(event.target.value)}/></td>
</tr>
<tr>
<td>Password:</td>
<td><input type='password'
placeholder="password"
name="password"
autoComplete="off"
onChange={event => setPassword(event.target.value)}/></td>
</tr>
<tr>
<td><input type='button' value='Login' onClick={() => login()} /></td>
<td><span className="Infotext">{infotext}</span></td>
</tr>
</tbody>
</table>
</form>
<p>
Need an account? <span className="Register" onClick={() => register()}>REGISTER</span>
</p>
</div>
)
}
export default Login;
|
Now returned response data is visible in the browser's inspector console:

How to store token?
Good questions is how to store returned token in the client side, so we can call a server side endpoints, which need an authorization?
How to store and use token
a) passing data between components with props
You can use object with your navigate() function to pass data to next page:
| navigate('/home', { state: response.data});
|
And you can read data in a target Home component using useLocation() function from react-router-dom.
1
2
3
4
5
6
7
8
9
10
11
12 | // Home component
function Home() {
const location = useLocation();
console.log(location.state);
return (
<div>
<Banner/>
<ToDoFormAndList/>
</div>
);
}
|

But, now this object is only available inside a Home component and not it's parents Banner and ToDoFormAndList, where we need it to send a request with a token to server side.
Of course, we can send it to another components via attributes.
1
2
3
4
5
6
7
8
9
10
11
12 | // Home component
function Home() {
const location = useLocation();
console.log(location.state);
return (
<div>
<Banner/>
<ToDoFormAndList state={location.state}/>
</div>
);
}
|
And it can be found from props object in ToDoFormAndList component.
| // App component
// ToDoFormAndList component
function ToDoFormAndList(props) {
console.log('ToDoFormAndList', props);
// ...
|

Ok, it works in a small application, which doesn't have a much components to share data, but in can be really mesh, if you have big application with deep level of components.
b) global state management
There are many state management libraries out there that help you do just that, such as Redux and MobX or you can just use a React's Context. React’s Context API simplifies the process of making data available to a large number of components, without having to manually pass that data through props at each level of your app’s component tree.
We will use React Context API in this example.
Create a new utils folder and context.js inside it.
The built-in factory function createContext(default) creates a context instance. We can use useContext() hook to update/modify the user data from the UserContext.
We also define a UserProvider, which is a Context.Provider component available on the context instance and it is used to provide the context to its child components, no matter how deep they are.
Now we will add a user state to hold user response data from the server side. We also create userLogin and user userLogout functions to change this user state. Note, that we have one extra auth value here (true/false). We will use that to detect is user logged in or not (and authorized to send axios calls to server side).
| utils/context.js |
|---|
 1
 2
 3
 4
 5
 6
 7
 8
 9
10
11
12
13
14
15
16
17
18
19
20
21
22
23
24
25
26
27
28
29
30
31
32
33
34 | import React, { useState, createContext } from 'react';
export const UserContext = createContext();
const UserProvider = ({ children }) => {
const [user, setUser] = useState(
{ username: '', id: '', token: '', auth: false }
);
const userLogin = (response) => {
setUser(() => ({
username: response.username,
id: response.id,
token: response.token,
auth: true
}));
};
const userLogout = () => {
setUser(() => ({
username: '',
token: '',
auth: false
}));
};
return (
<UserContext.Provider value={{ user, userLogin, userLogout }}>
{children}
</UserContext.Provider>
);
}
export default UserProvider;
|
We will wrap all the components that share data within the context provider as a parent component. Modify your index.js to use above UserProvider. Now your UserContext will be available in all the components inside a App component == whole our React Todo App.
| index.js |
|---|
1
2
3
4
5
6
7
8
9
10
11
12
13
14
15
16
17
18
19
20 | import React from 'react';
import ReactDOM from 'react-dom/client';
import './index.css';
import App from './App';
import reportWebVitals from './reportWebVitals';
import { BrowserRouter } from "react-router-dom";
import UserProvider from './utils/context';
const root = ReactDOM.createRoot(document.getElementById('root'));
root.render(
<React.StrictMode>
<BrowserRouter>
<UserProvider>
<App />
</UserProvider>
</BrowserRouter>
</React.StrictMode>
);
reportWebVitals();
|
Modify Login page to use Context
Now we need to modify our Login page to use UserContext to store login information.
- Use
UserContext in Login page
- Use
userLogin function from UserContext
- Save server response data to
UserContext with userLogin function
| src/routes/login.js |
|---|
1
2
3
4
5
6
7
8
9
10
11
12
13
14
15
16
17
18
19
20
21
22
23
24 | // use UserContext
import { UserContext } from '../utils/context';
function Login() {
// use userLogin function from UserContext
const { userLogin } = useContext(UserContext);
// ...
const login = async () => {
const data = {
'username': username,
'password': password
}
try {
const response = await axios.post('http://localhost:3000/api/login', data);
//console.log(response.data);
// save user token to UserContext
userLogin(response.data);
setInfotext('User login successfully! Home in 2 sec.');
setTimeout(navigate('/home', { state: response.data} ), 2000);
} catch (error) {
//console.log(error.response);
setInfotext(error.response.data.error);
}
}
|
Home page and authentication
We need to check is user successfully logged in inside a /home route. Open your browser and type a http://localhost:3001/home (change your correct port number for a React App) and you should see a home page EVEN user is not logged in!
Modify your Home component to detect is user authorized. We will use useEffect hook, which will be run after rendering process. If user is not logged in we will change application route back to `/login'.
| routes/home.js |
|---|
1
2
3
4
5
6
7
8
9
10
11
12
13
14
15
16
17
18
19
20 | import { UserContext } from '../utils/context';
import { useNavigate } from "react-router-dom";
//...
// Home component
function Home() {
const navigate = useNavigate();
const { user } = useContext(UserContext);
useEffect(() => {
if (!user.auth) navigate('/login');
}, [user, navigate]);
return (
<div>
<Banner/>
<ToDoFormAndList/>
</div>
);
}
|
Load users todos
Modify your Home page to load all the users todos, if user is logged successfully. Send a token to the server side with Bearer Authorization header. Server will send all the users todos back to client.
| routes/home.js |
|---|
 1
 2
 3
 4
 5
 6
 7
 8
 9
10
11
12
13
14
15
16
17
18
19
20
21
22
23
24
25
26 | // ToDoFormAndList component
function ToDoFormAndList() {
const [newTodoText, setNewTodoText] = useState("");
const [todos, setTodos] = useState([]);
const { user } = useContext(UserContext);
// start loading datas from backend
useEffect(() => {
// load todos from backend
async function fetchData() {
try {
let response = await axios.get('http://localhost:3000/api/todos',
{
headers: {
'Authorization': `Bearer ${user.token}`
}
}
);
setTodos(response.data.data);
} catch (error) {
console.log(error);
}
}
if (user.auth) fetchData();
}, [user]) // load once, use => []
//...
|
Add a new todo
We will need to add a token headers, when we are sending a new todo data to server side.
| routes/home.js |
|---|
1
2
3
4
5
6
7
8
9
10
11
12
13
14
15
16
17 | // add a new item
const addTodo = async () => {
//console.log(`Add a new todo ${newTodoText}`);
const data = {
'text': newTodoText,
'date': moment().format() // "2023-01-24T12:07:58+02:00"
}
const response = await axios.post('http://localhost:3000/api/todos', data,
{
headers: {
'Authorization': `Bearer ${user.token}`
}
});
//console.log(response.data);
setTodos([...todos, response.data.data])
setNewTodoText('');
}
|
Remove a new todo
We will need to add a token headers, when we are removing a todo.
| routes/home.js |
|---|
1
2
3
4
5
6
7
8
9
10
11
12
13
14 | // remove todo
const removeTodo = async (id) => {
//console.log(id)
const response = await axios.delete(`http://localhost:3000/api/todos/${id}`,
{
headers: {
'Authorization': `Bearer ${user.token}`
}
});
console.log(response.data);
// filter/remove todo item from todos state array
let newTodos = todos.filter(todo => todo._id !== id)
setTodos(newTodos)
}
|
Logout
We need to modify user inside a UserContext and change route back to /login.
Modify logout button to call logout() function.
| routes/home.js |
|---|
| <input type='button' value='Logout' onClick = { () => logout()}/>
|
And create a logout() function inside ToDoFormAndList component. Remember use userLogout from UserContext.
| routes/home.js |
|---|
| function ToDoFormAndList() {
const { user, userLogout } = useContext(UserContext);
// ...
// logout
const logout = () => {
userLogout();
navigate('/');
}
//..
|
Logout and remember try /home route with your browser at http://localhost:3001/home. It should send you back to Login page. Token and other user information is not available anymore in UserContext.
Final words
This exercise was a just a quick demo which shows how to create fullstack application with React, Node, Express and Mongo with authentication.
Read More
Goals of this topic
Understand
- Understand the basic of the FullStack application development with authentication.