JSON Web Tokens
Introduction
JSON Web Tokens (JWT) are used with authentication in web applications. JWT is used to send information that can be verified like a digital signature in server side application. JWT is used usually with HTTP Authorization headers with web request to server side. It is represented as a sequence of base64url encoded values that are separated by period characters.
For example Node.js application are stateless, so developers needs some technology to authenticate client application request to server side. Token based JWT authentication is stateless, so there is no need to store information in any session to the server side.
Process:
- User will log to web application with username and password
- Server will indentify the user and will return JWT token from the server side to the client application
- Client application stores the JWT client to the application state or for example to the local storage
- Client application will send requests to the server side with the JWT token
- Server side application will validate the JWT token and will respond to the client side application
Look process diagram from Authentication material.
This is how nowadays applications will use JWT token to check authentication and request made by the client side application. Now the same token can be used with other domains where the user is logged in at the first place. This way we can scale up our application.
JWTs consist
This is one example how a JSON Web Token looks like (new lines inserted at dots to improve readability). It is three Base64-URL strings separated by dots that can be easily passed in HTML and HTTP environments.
1 2 3 | |
This might look like garbage, but it is actually a compact presentation of a series of claims, paired with a signature to verify authencity.
JWTs consist of three parts separated by dots.
header
The header typically consists of two parts: the type of the token, which is JWT, and the signing algorithm being used, such as HMAC SHA256 or RSA.
1 2 3 4 | |
payload
The second part of the token is the payload, which contains the claims. Claims are statements about an entity (typically, the user) and additional data. There are three types of claims: registered, public, and private claims.
1 2 3 4 5 | |
Signature
To create the signature part you have to take the encoded header, the encoded payload, a secret, the algorithm specified in the header, and sign that.
1 2 3 4 | |
How do JSON Web Tokens work?
In authentication, when the user successfully logs in using their credentials, a JSON Web Token will be returned. Since tokens are credentials, great care must be taken to prevent security issues. In general, you should not keep tokens longer than required. You can store it for example React application state. So it will be available when user is using an application.
Look process diagram from Authentication material.
Whenever the user wants to access a protected route or resource, the user agent should send the JWT, typically in the Authorization header using the Bearer schema.
1 | |
The server's protected routes will check for a valid JWT in the Authorization header, and if it's present, the user will be allowed to access protected resources. If the JWT contains the necessary data, the need to query the database for certain operations may be reduced, though this may not always be the case.
Example project
Let's create a small demo app to test JWT with Node.js application.
Create a new project and install packages
First create a new Node.js project. Install a few packages
We will use a following packages:
- express to create web server with Node.js.
- jsonwebtoken to handle authentication and authorization.
- mongoose to communicate with MongoDB.
- dotenv to store server secrets.
- bcrypt to safely store a user password.
- mongoose-unique-validator to detect unique fields within a Mongoose schema.
- nodemon restart server automatically when files are modified.
1 2 3 4 5 6 7 8 9 10 | |
Environment variables and server secrets
Create .env file to store server side secrets. You will need to generate a server side secret string to use JWT. Basicly you can use any string, but you can use Node to generate this string to you. Creating a random string for the server secret can be done in the Node.js REPL with the crypto module.
Launch a Node without any JavaScript file:
1 2 3 4 5 6 | |
Add generated secret string and .env file (and other needed variables):
| .evn | |
|---|---|
1 2 3 | |
Create a User Model
Create a User Model to store User username and passwordHash. Use Mongoose Unique Validator to validate unique user username. User will have passwordHash, which will be created with bcrypt.
When User is asked as a JSON, transform is used to remove passwordHash from the returning JSON data / document. SO, password hash string is not visible at any UI or can't be get by the caller client. Read more about Transform.
| models/user.js | |
|---|---|
1 2 3 4 5 6 7 8 9 10 11 12 13 14 15 16 17 18 19 20 21 22 23 | |
Create a connection to MongoDB
Create index.js file to your project, use User Model and make a connection to MongoDB.
| index.js | |
|---|---|
1 2 3 4 5 6 7 8 9 10 11 12 13 14 15 16 17 18 19 20 21 22 23 24 25 26 27 28 29 30 | |
Register/Add a new user
Create a new users.js file to your controllers folder. Create a new endpoint for POST method, which will be used to add a new user to MongoDB. Use bcrypt to hash user password and create a new user. Save user to MongoDB.
| controllers/users.js | |
|---|---|
1 2 3 4 5 6 7 8 9 10 11 12 13 14 15 16 17 18 19 20 21 22 23 24 | |
Use users router in your index.js.
| index.js | |
|---|---|
1 2 3 | |
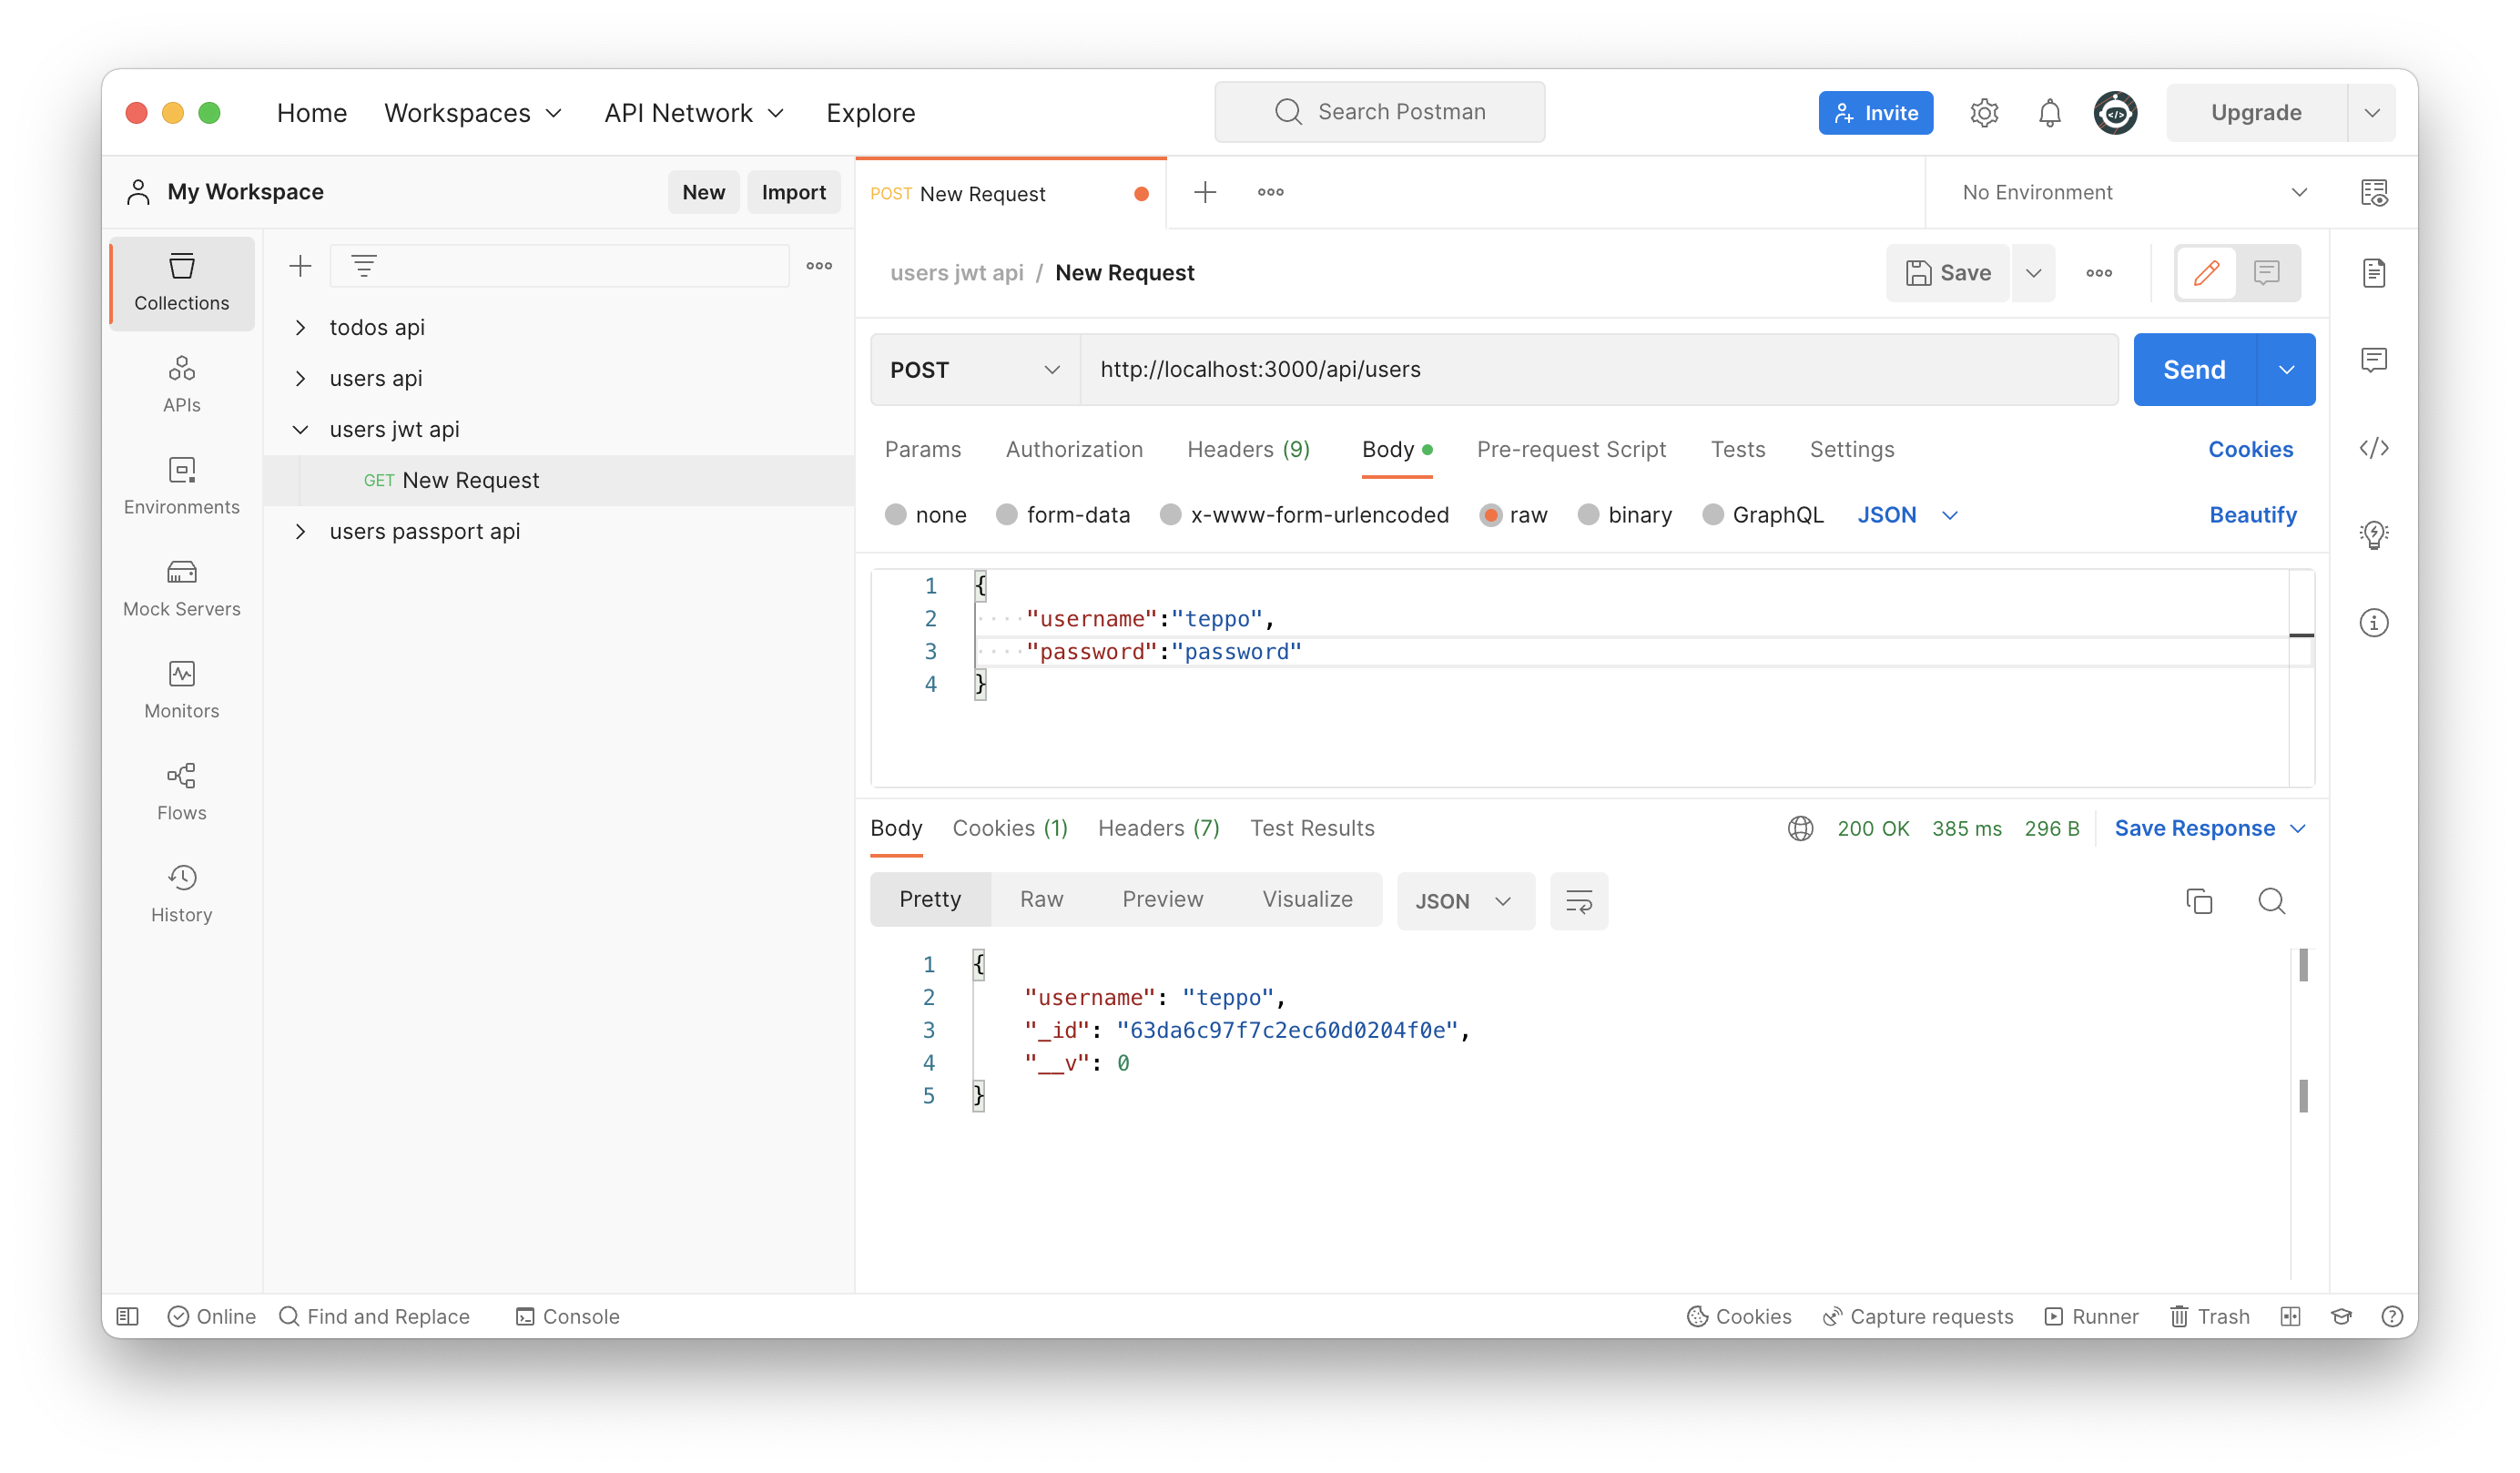
Use Postman to register a new user. Note that returned user JSON doesn't have passwordHash field in JSON. Click image to see it bigger!
Look your MongoDB and find your stored user. Note that password is hashed.

Possible errors with a saving will be now send to middleware. Create a new middlewares folder and a new errorHandler.js file to detect errors with mongoose-unique-validator.
| middlewares/errorHandler.js | |
|---|---|
1 2 3 4 5 6 7 8 | |
Remember use created errorHandler.js middleware in your index.js.
| index.js | |
|---|---|
1 2 3 | |
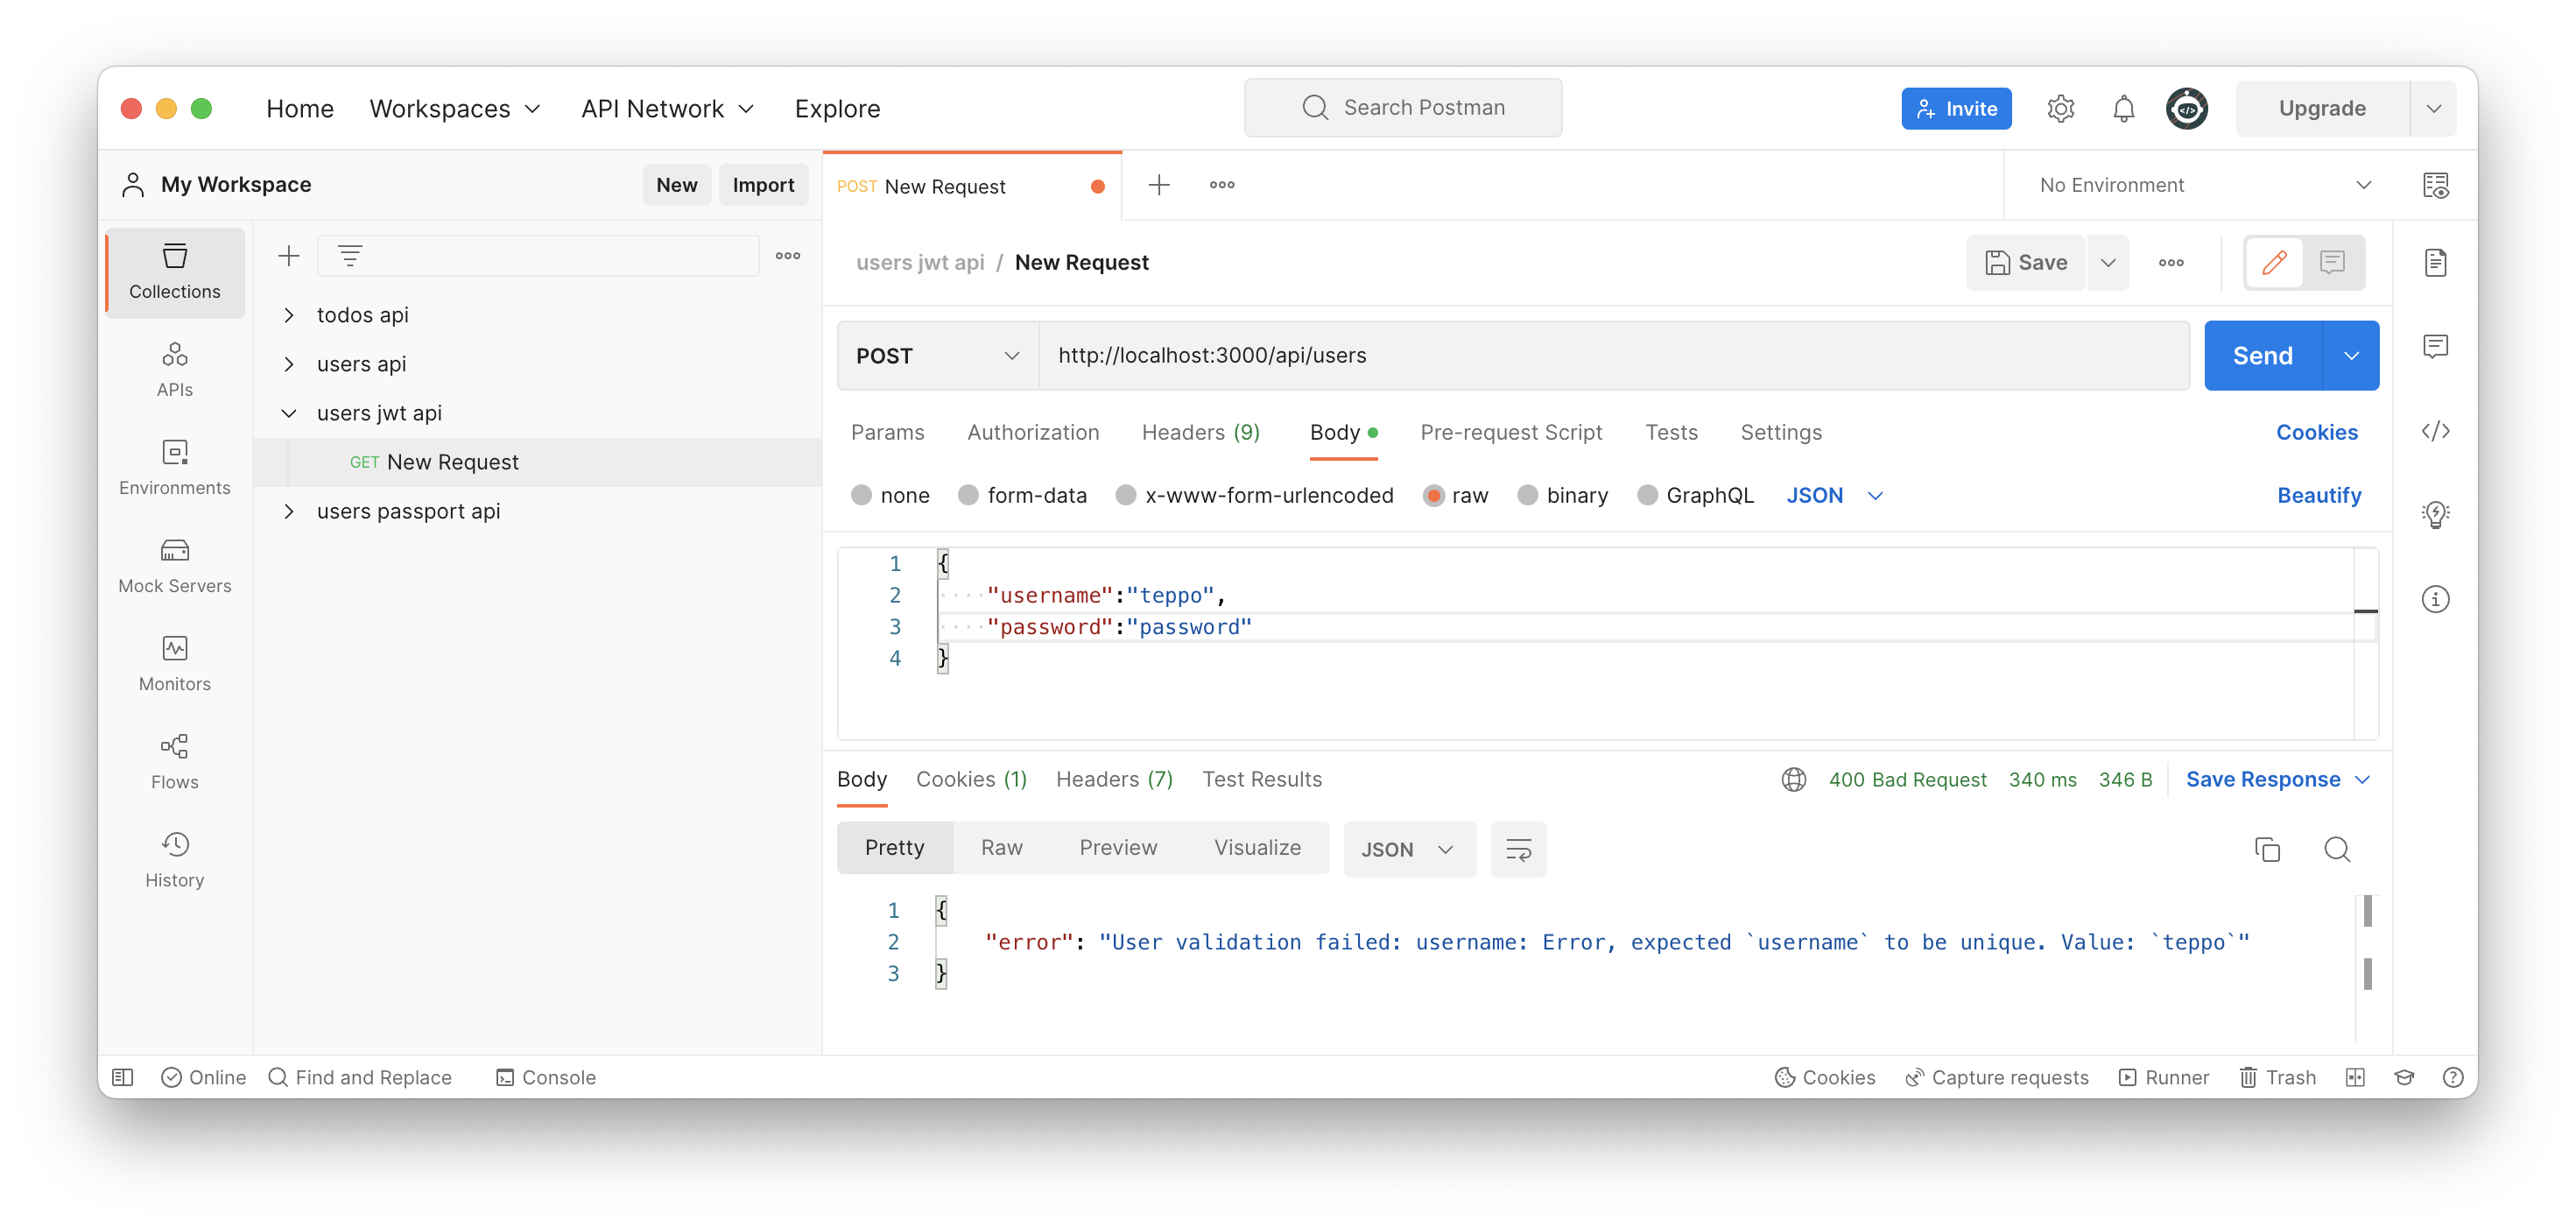
Try to add another user with a same username and check how mongoose-unique-validator will detect attempt to create a new user with same username.
Create a Login route and get JWT token
Create a new login route controller controllers/login.js to your Node.js application. First user will be found from MongoDB with findOne function.
First user will be found from the MongoDB and then password correction will be checked with bcrypt.compare function. Unauthorized statuscode 400 will be returned if users's password is not correct one. A new JWT token will be created, if username and password are correct with jwt.sign() function. Token, username and id will be send back to the client.
| controllers/login.js | |
|---|---|
1 2 3 4 5 6 7 8 9 10 11 12 13 14 15 16 17 18 19 20 21 22 23 24 25 26 27 28 | |
Use login router in your index.js.
| index.js | |
|---|---|
1 2 3 | |
Use Postman to send login request to server side. JWT token will be send to the client. Client should store this client somehow and it need to be used with other request to server side. Click image to see it bigger!
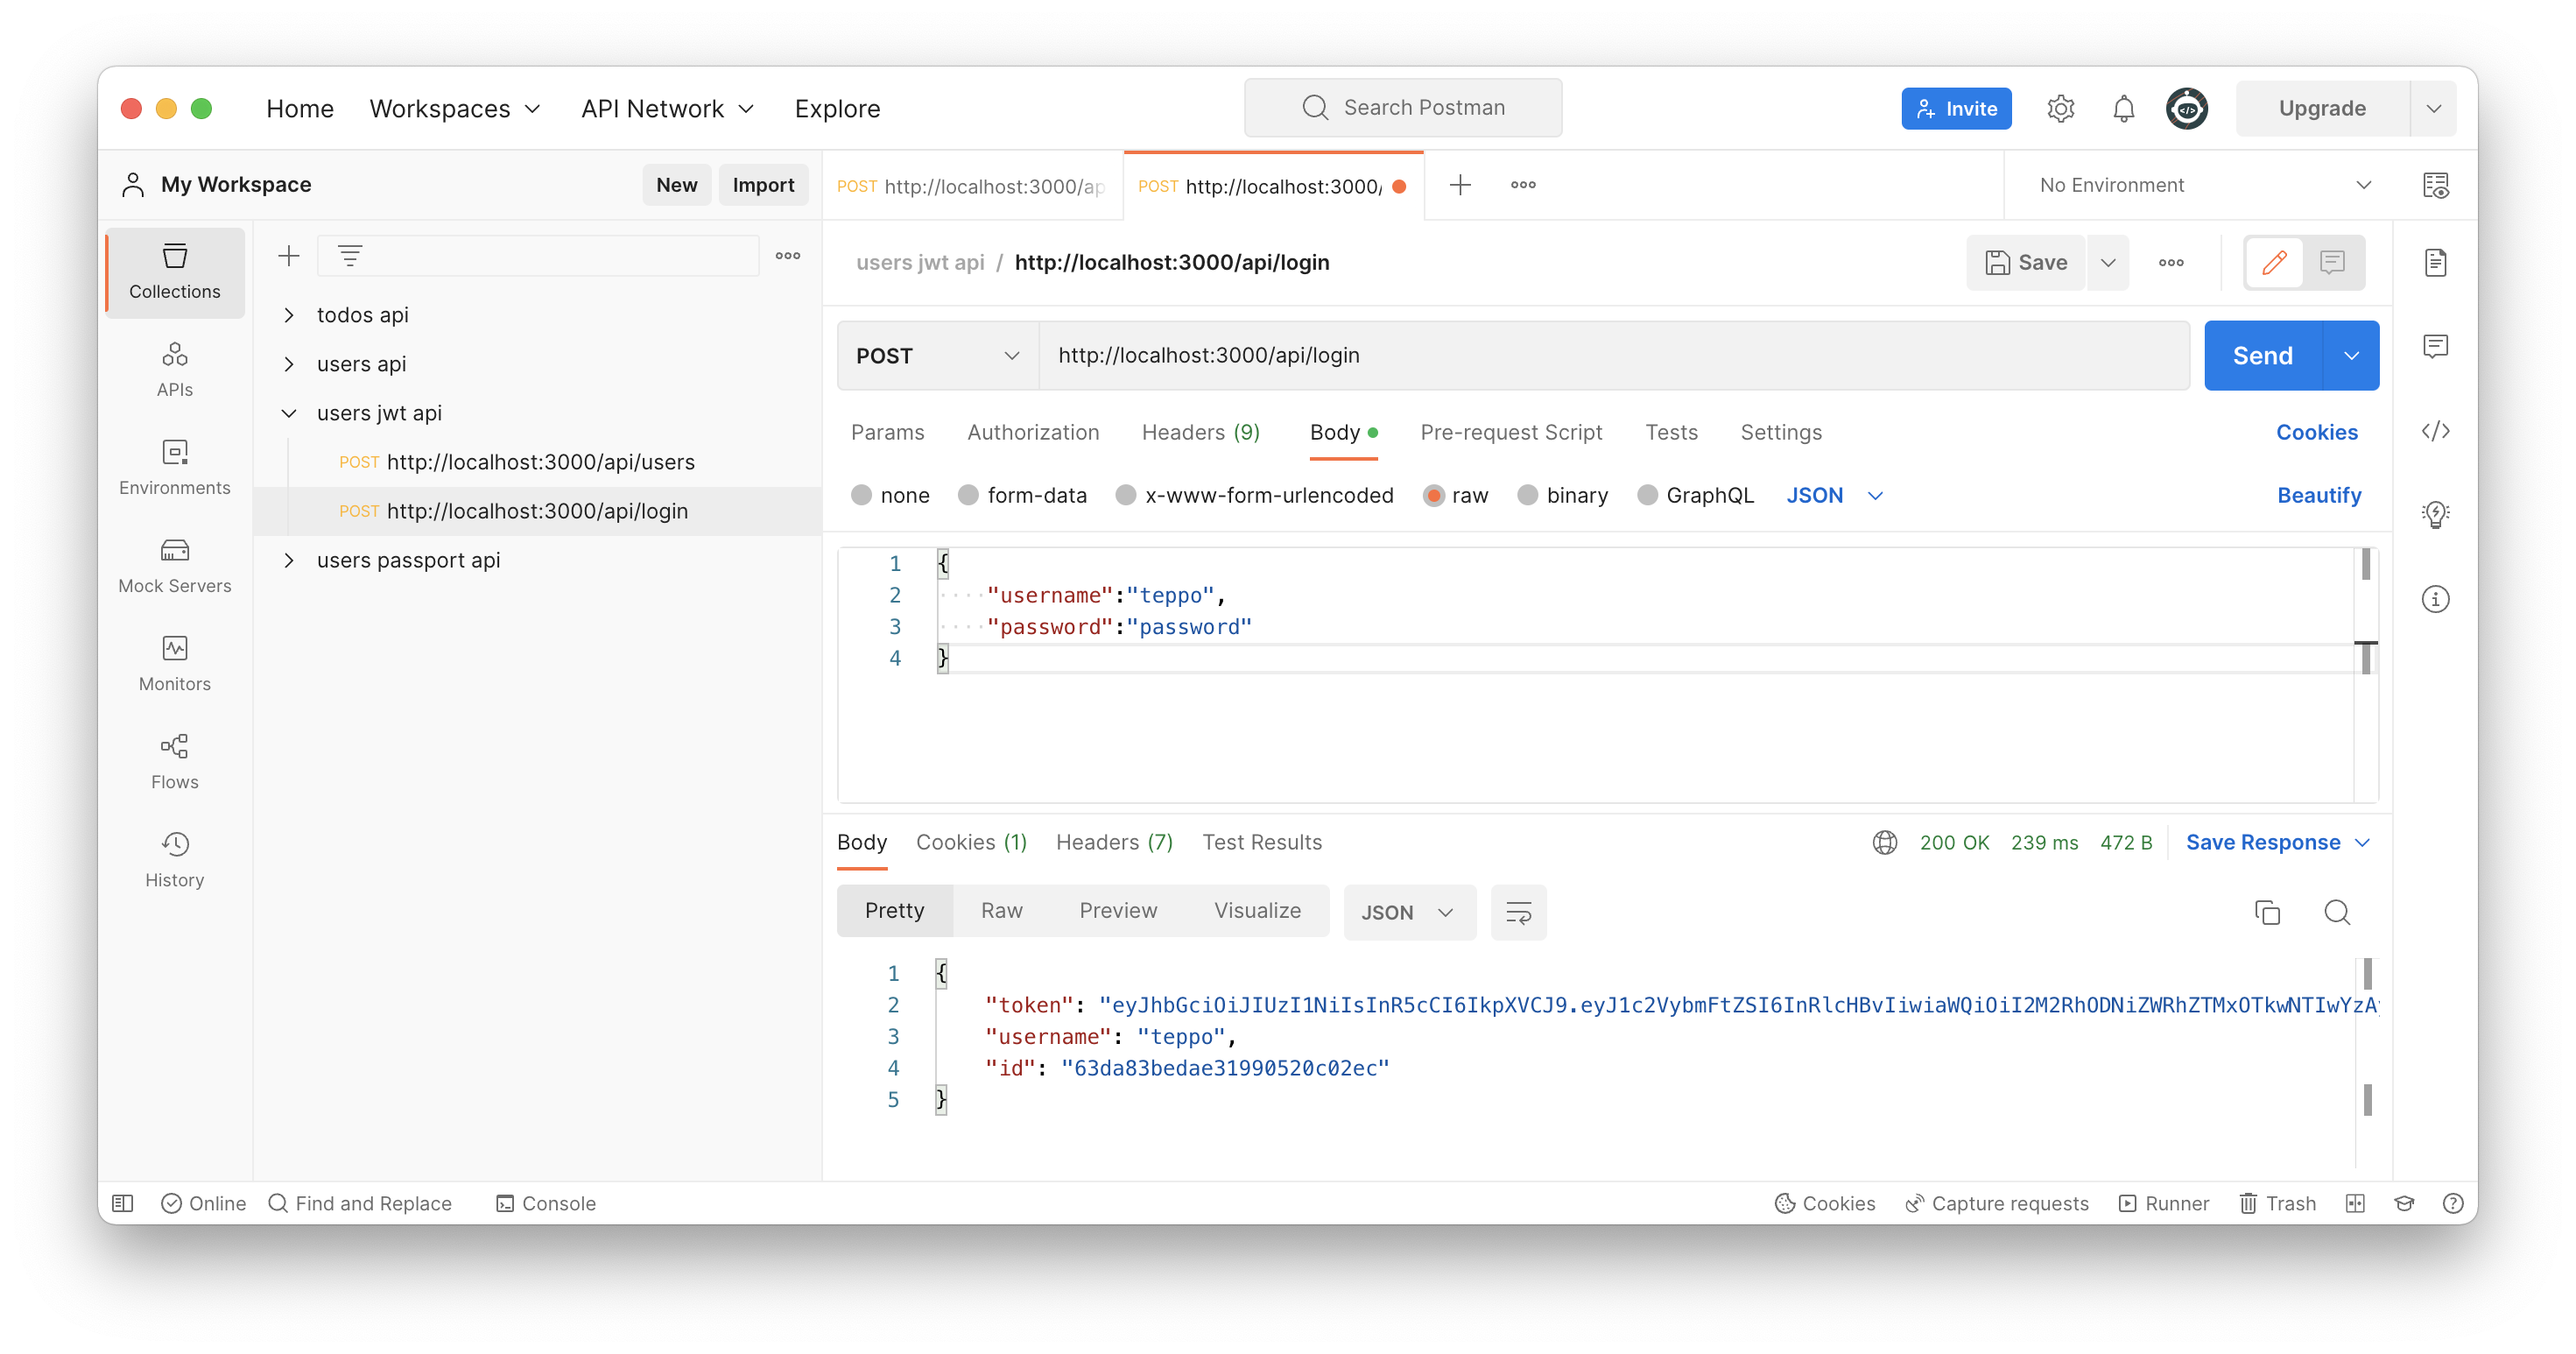
You should see a token in a Postman.
1 2 3 4 5 | |
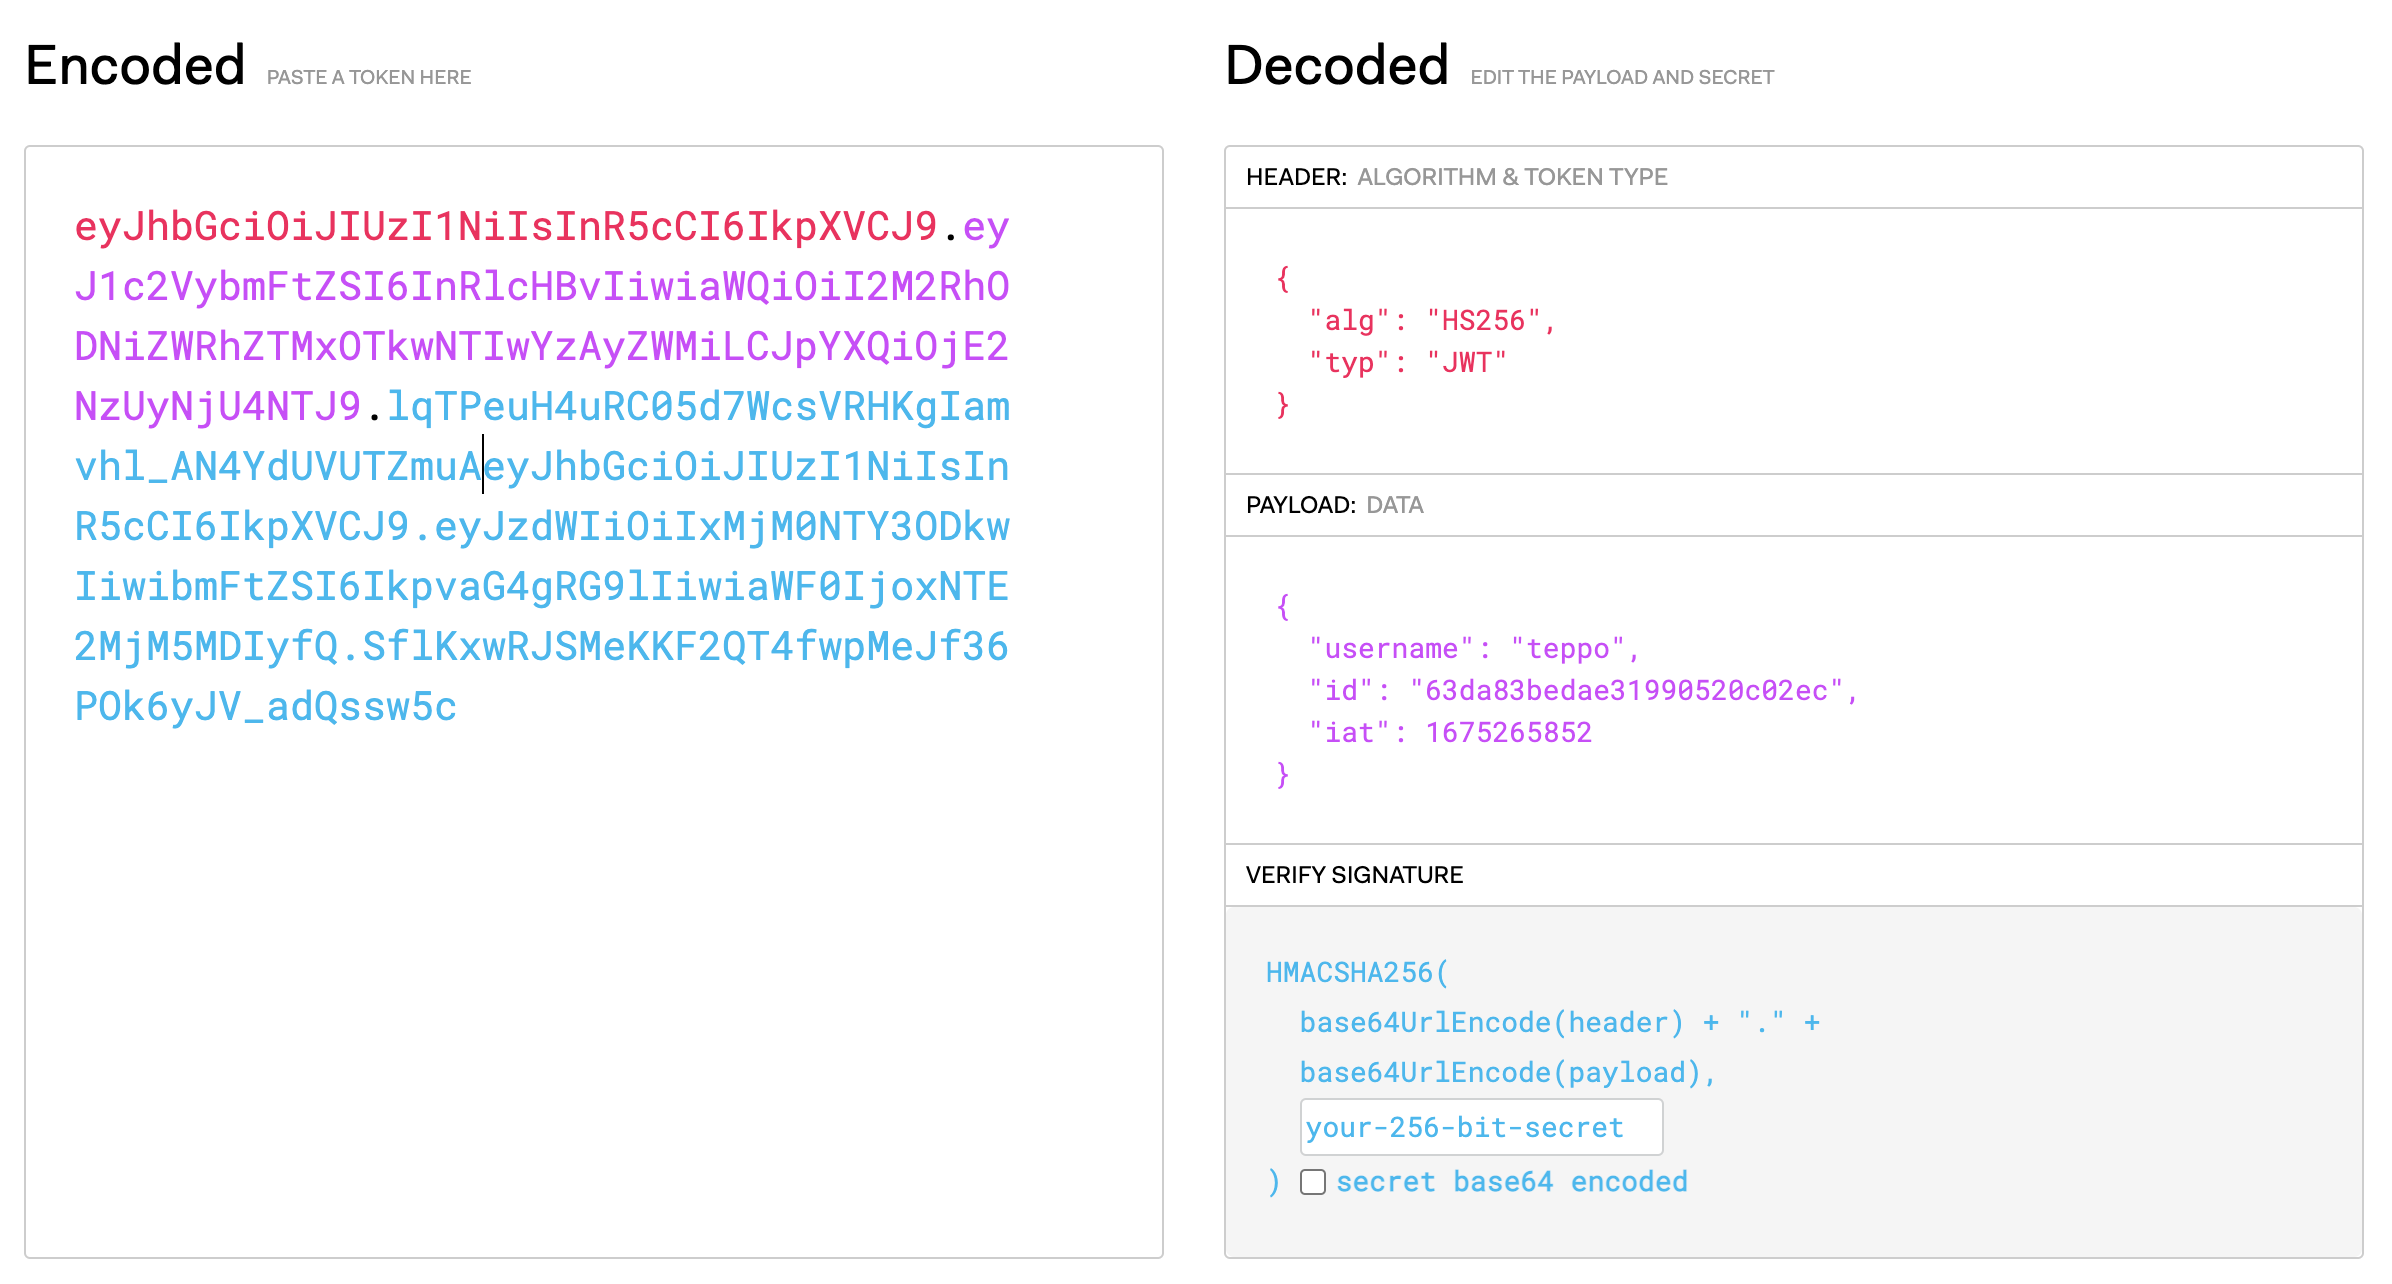
You can test your token with jwt.io to get a look at the payload included in the token. Just copy and paste your token there.
Request endpoint with JWT token
Create a new data route controller controllers/data.js to your Node.js application. This endpoint will be used to test request with JWT token. JWT Token will be get with Bearer authentication type. Token will be validated with jwt.verify() function.
| controllers/data.js | |
|---|---|
1 2 3 4 5 6 7 8 9 10 11 12 13 14 15 16 17 18 19 20 21 22 23 | |
Use data router in your index.js.
| index.js | |
|---|---|
1 2 3 | |
Use Postman to send get request to server side with JWT token. Server should send data back if authorization is successfull.
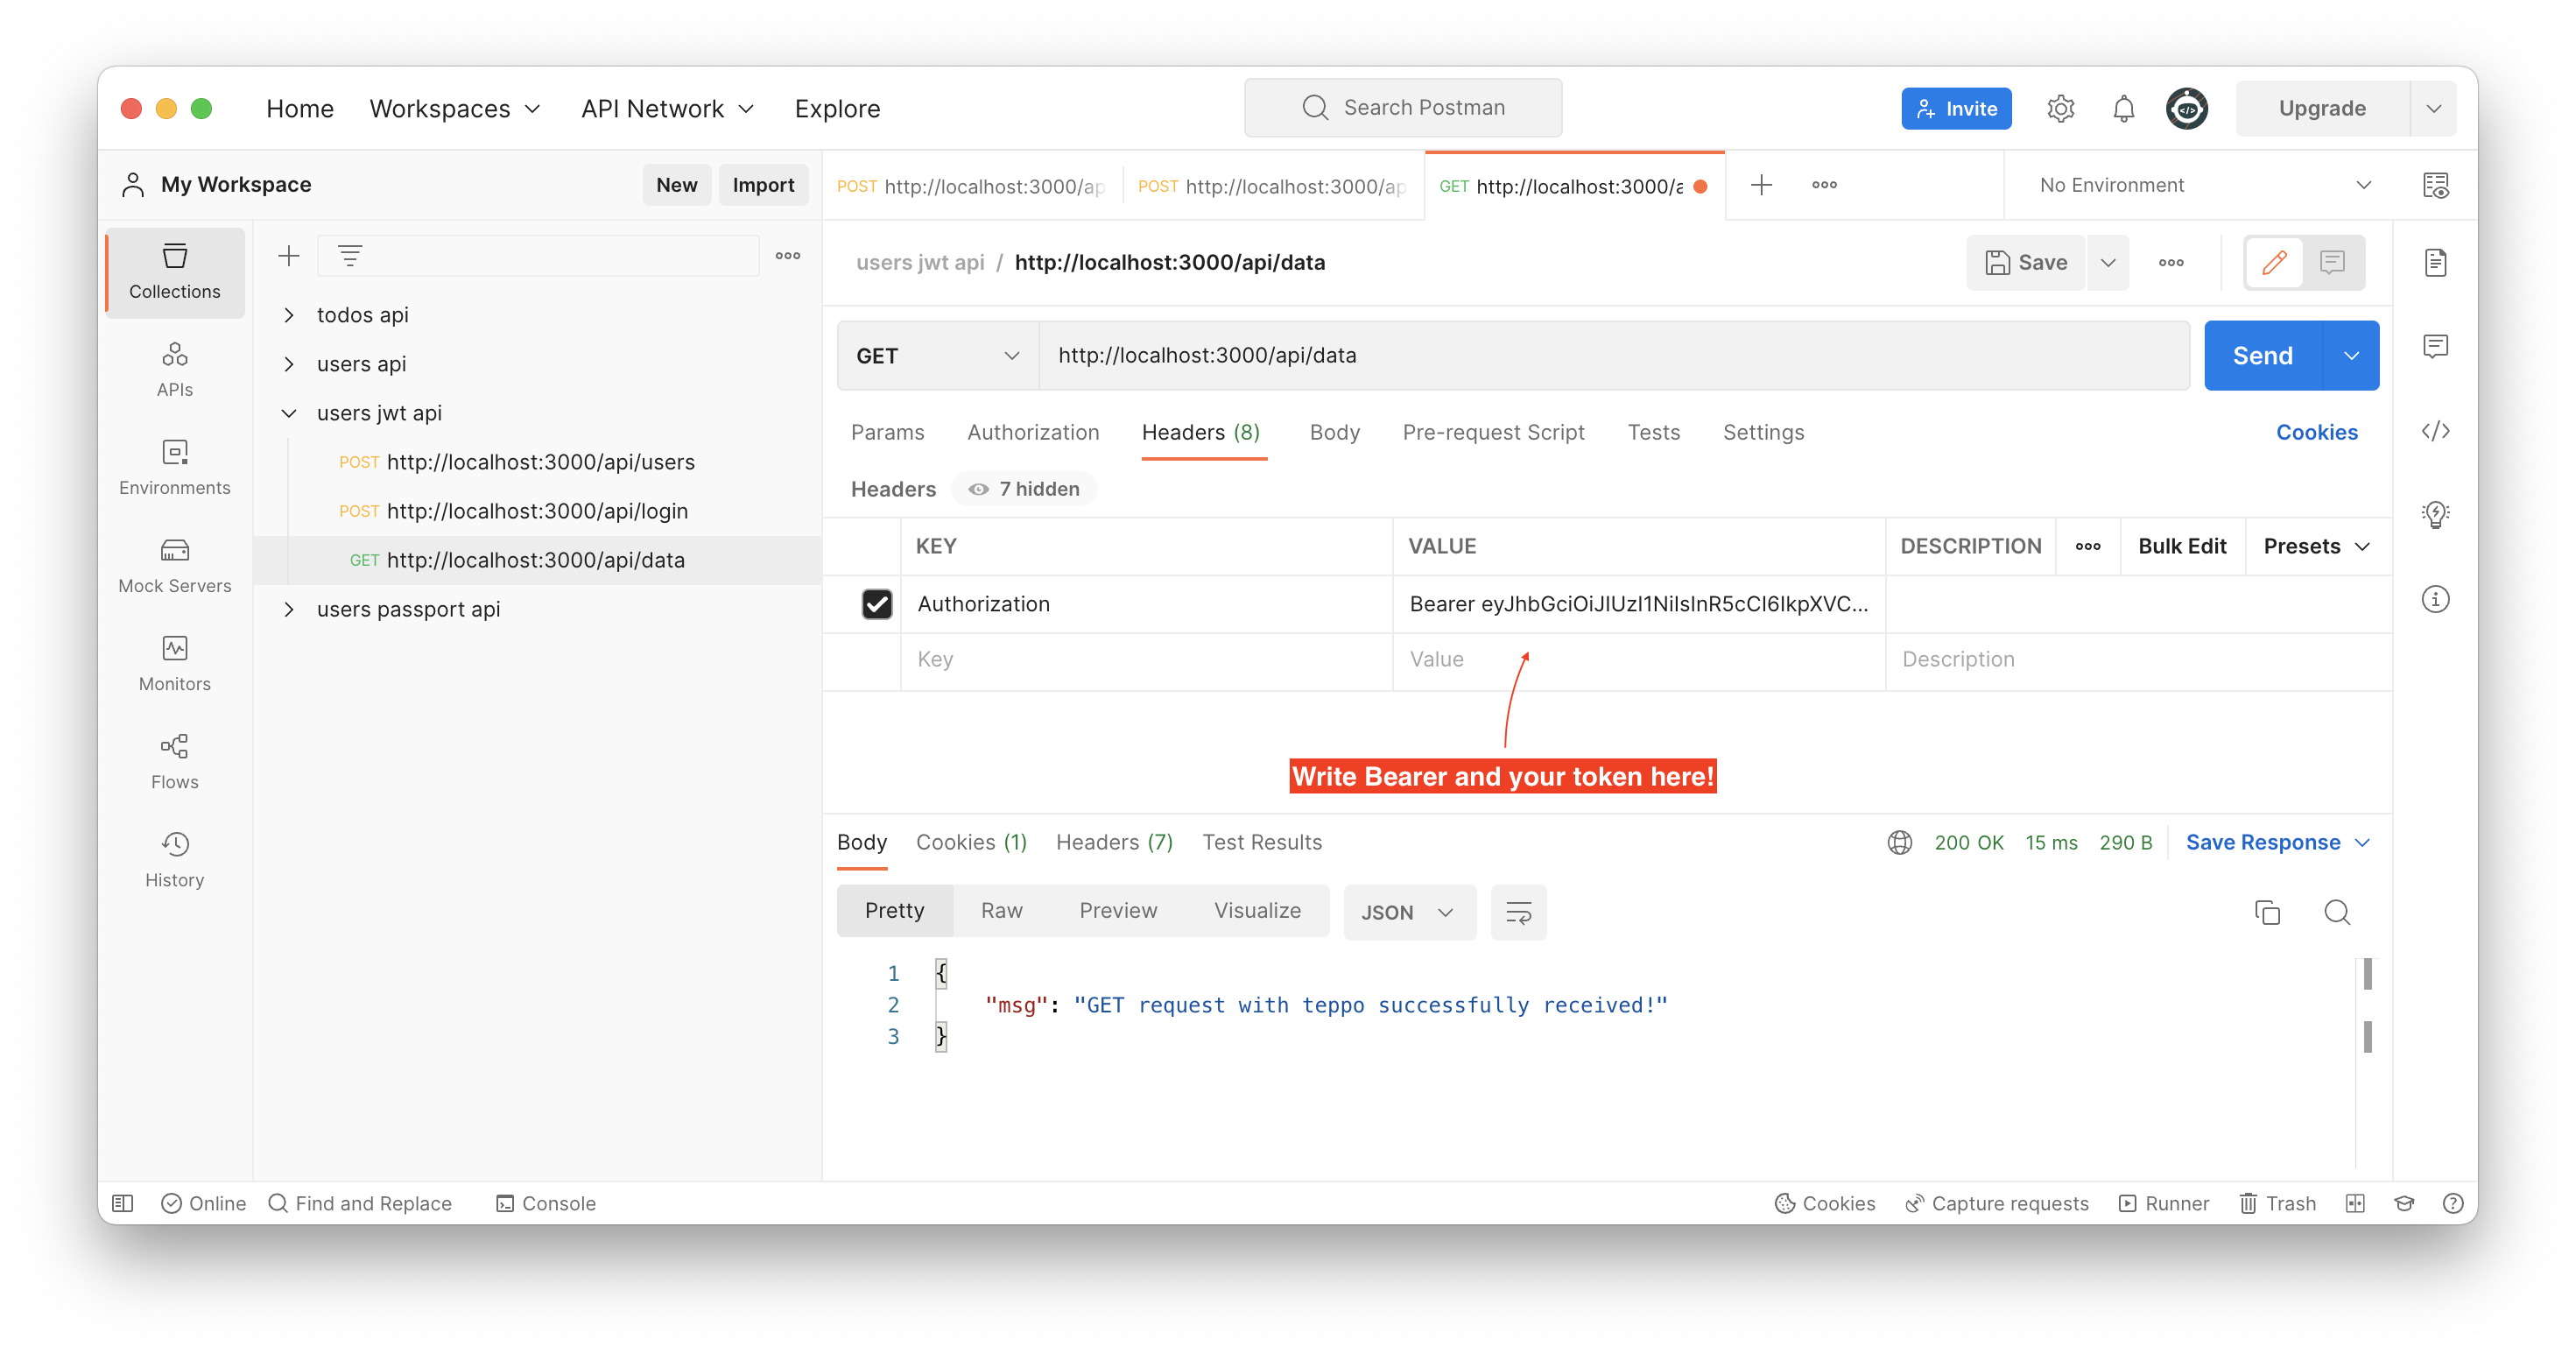
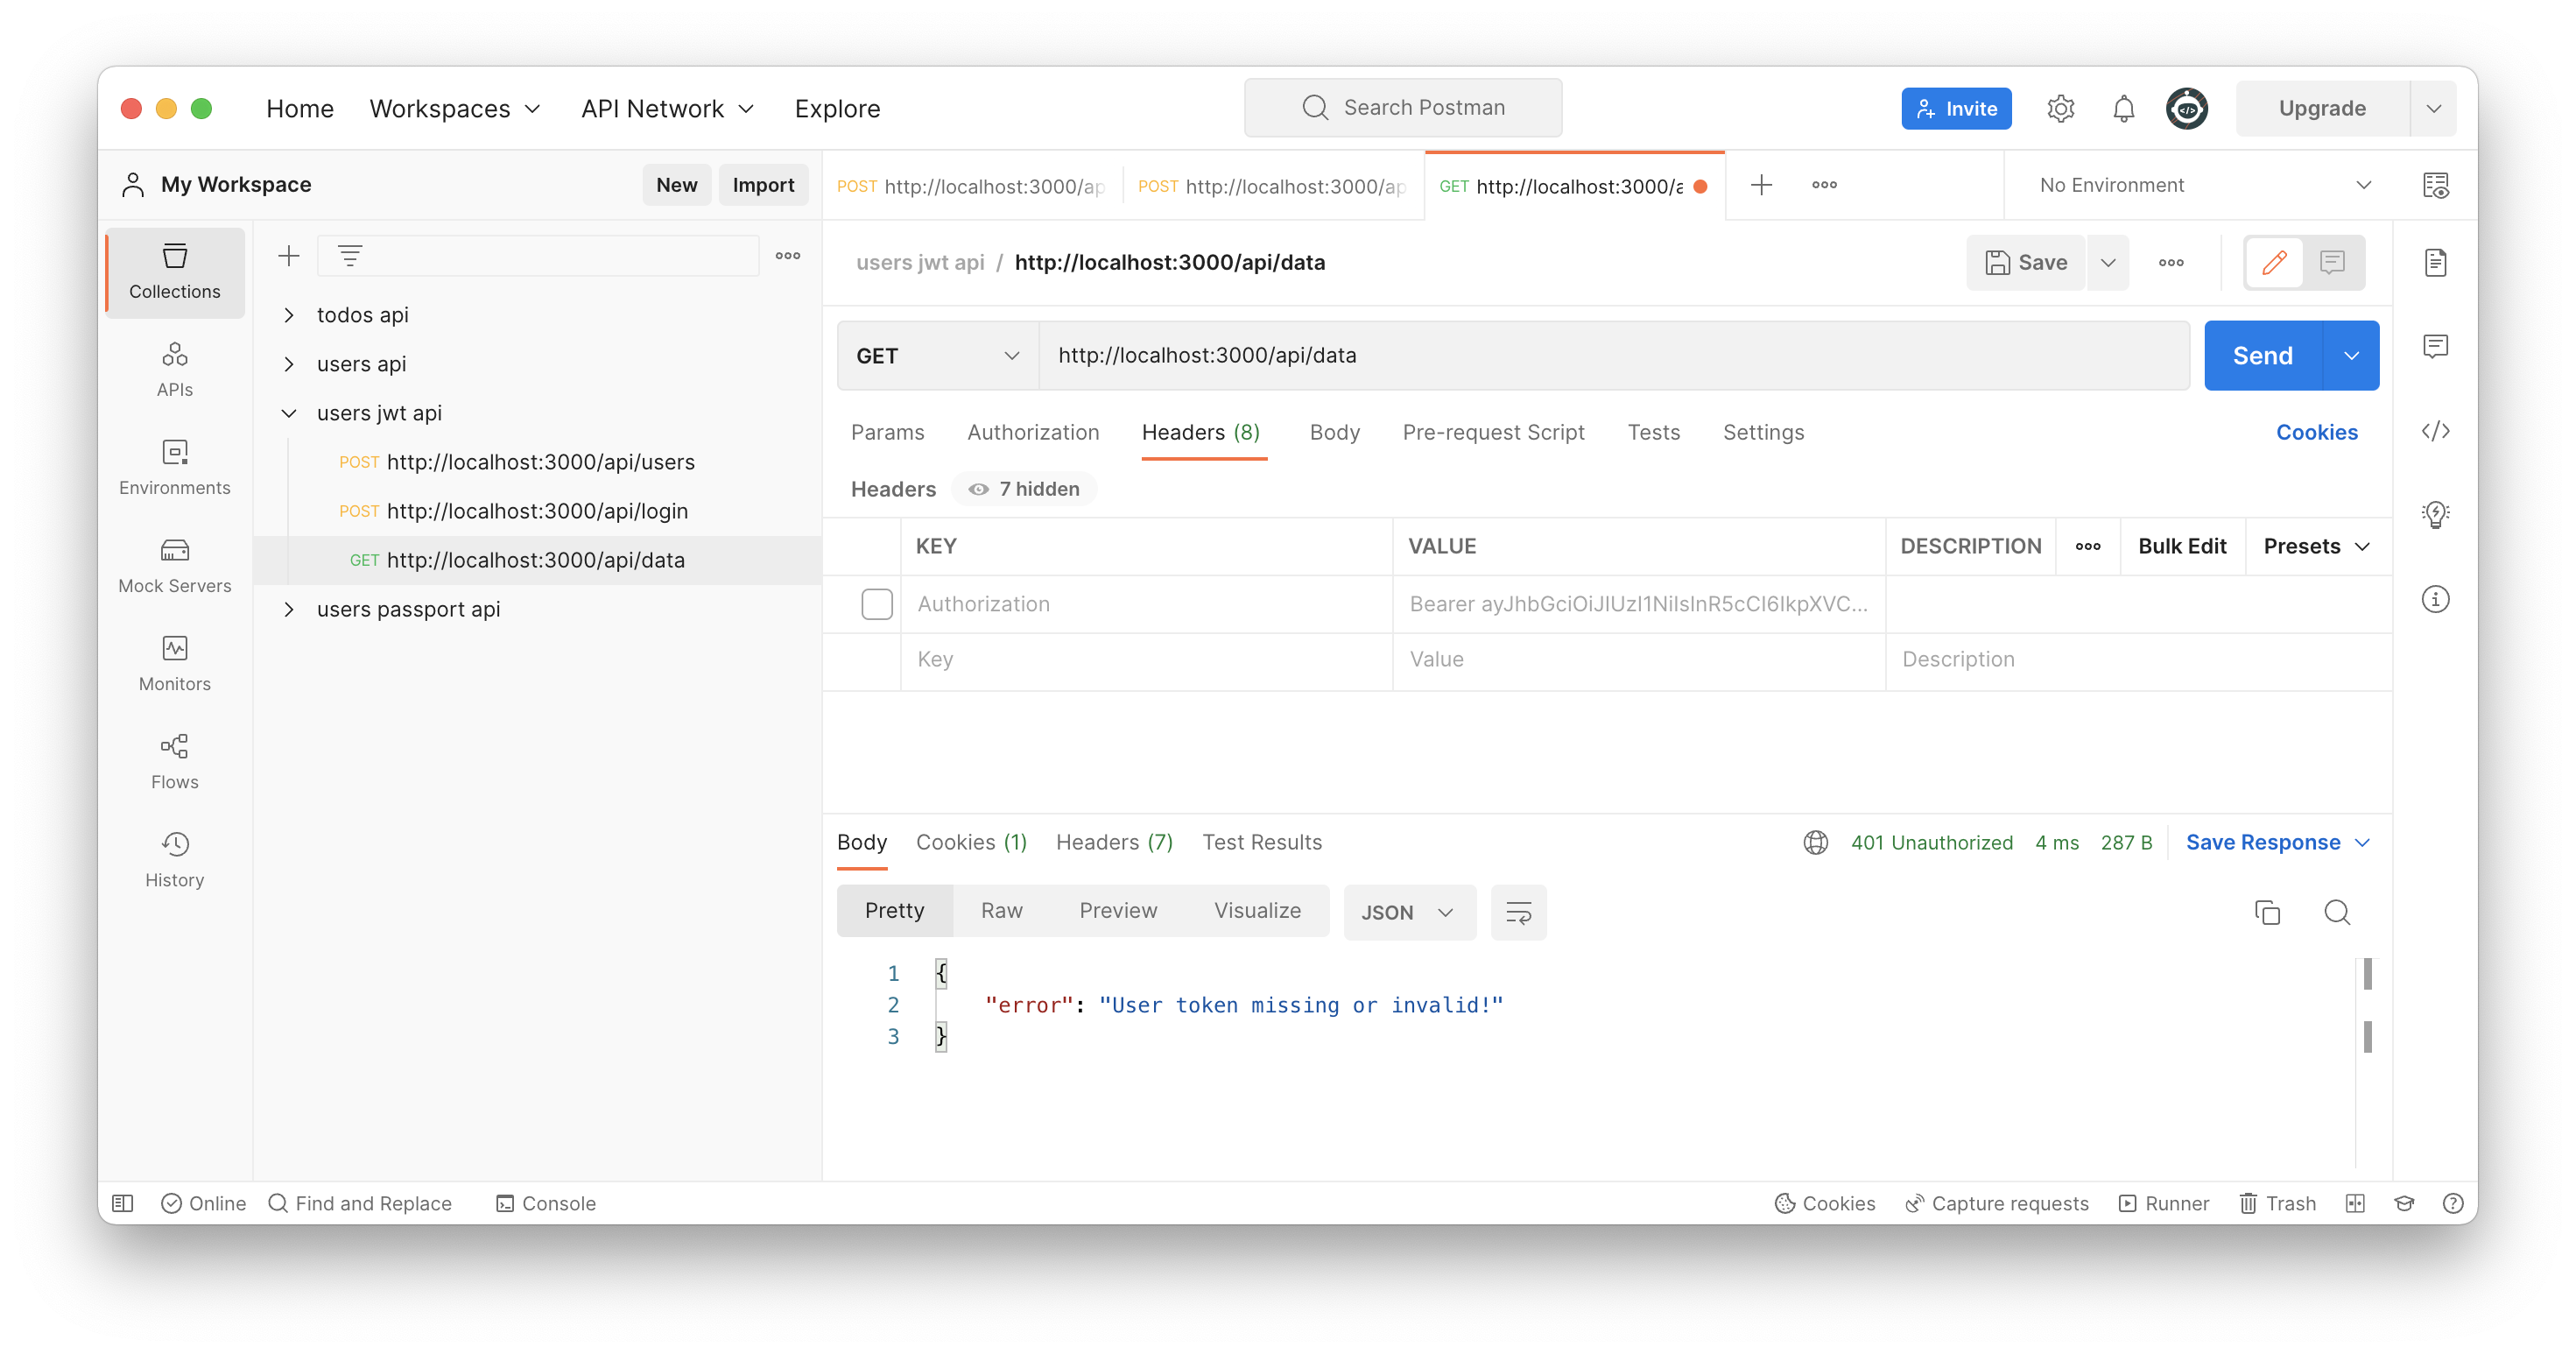
Try to access /api/data endpoint also without a valid JWT token or without token.

Authorization middleware
Now authorization is done in one route and inside it's controller. How about if you need authorization in multiple routes? Do you just copy and paste authorization code to every route - hope not! So it would be a good idea to move authorization to middleware and use it before every route that needs a authorization.
Create a new auth.js to your middlewares folder.
| middlewares/auth.js | |
|---|---|
1 2 3 4 5 6 7 8 | |
And require your authorization middleware in your index.js before earlier made data route AND use it in your protected /api/data route before dataRouter.
| index.js | |
|---|---|
1 2 3 4 5 6 | |
Now everytime a client send request to /api/data route, request goes through the created auth middleware first. In the middleware we have used a next() function, so the control is passed on to the dataRouter controller.
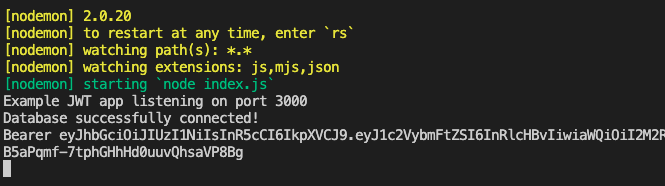
Send a get request to /api/data route from Postman and look your terminal window. It should show a token sent from Postman. Of course user need to be logged in and use correct token.
Ok, now we know how auth middleware will be called before needed protected routes. So we need to check JWT token in our auth middleware. Modify your middlewares/auth.js to include authorization code from previously made data controller.
| middlewares/auth.js | |
|---|---|
1 2 3 4 5 6 7 8 9 10 11 12 13 14 15 16 17 18 19 20 21 22 23 24 | |
Modify your data.js controller to only send data back to client.
| controllers/data.js | |
|---|---|
1 2 3 4 5 6 7 8 | |
Final words
This was just a quick look to JWT. There are still much more to learn like handle token expiration time or how to renewing a token etc.. You can learn those consepts by yourself.
Read more
- JWT
- jsonwebtoken - npm
- jsonwebtoken - homepage
- Authorization
- Authorization with Postman
- Authentication schemes
Goals of this topic
Understand
- Authentication and authorization with JWT Tokens.